

If you’re looking for a comprehensive guide on how to activate your Bitdefender product, here’s the right place for you. Regardless of which product you purchase, you need to activate and manage it from your Bitdefender Central account.
In the next paragraphs, you’ll read about the details of subscription activation and in the same fashion, how you should activate a product on each Operating System. First off, let’s go through the steps regarding subscriptions on Bitdefender Central.
Note: The source of all images is the official Bitdefender website.
[ez-toc]
Step 1: How to Create a Bitdefender Central Account
As the name implies, Bitdefender Central is the account management center for all Bitdefender products. Therefore, registering for a new account is the first step every user should take.
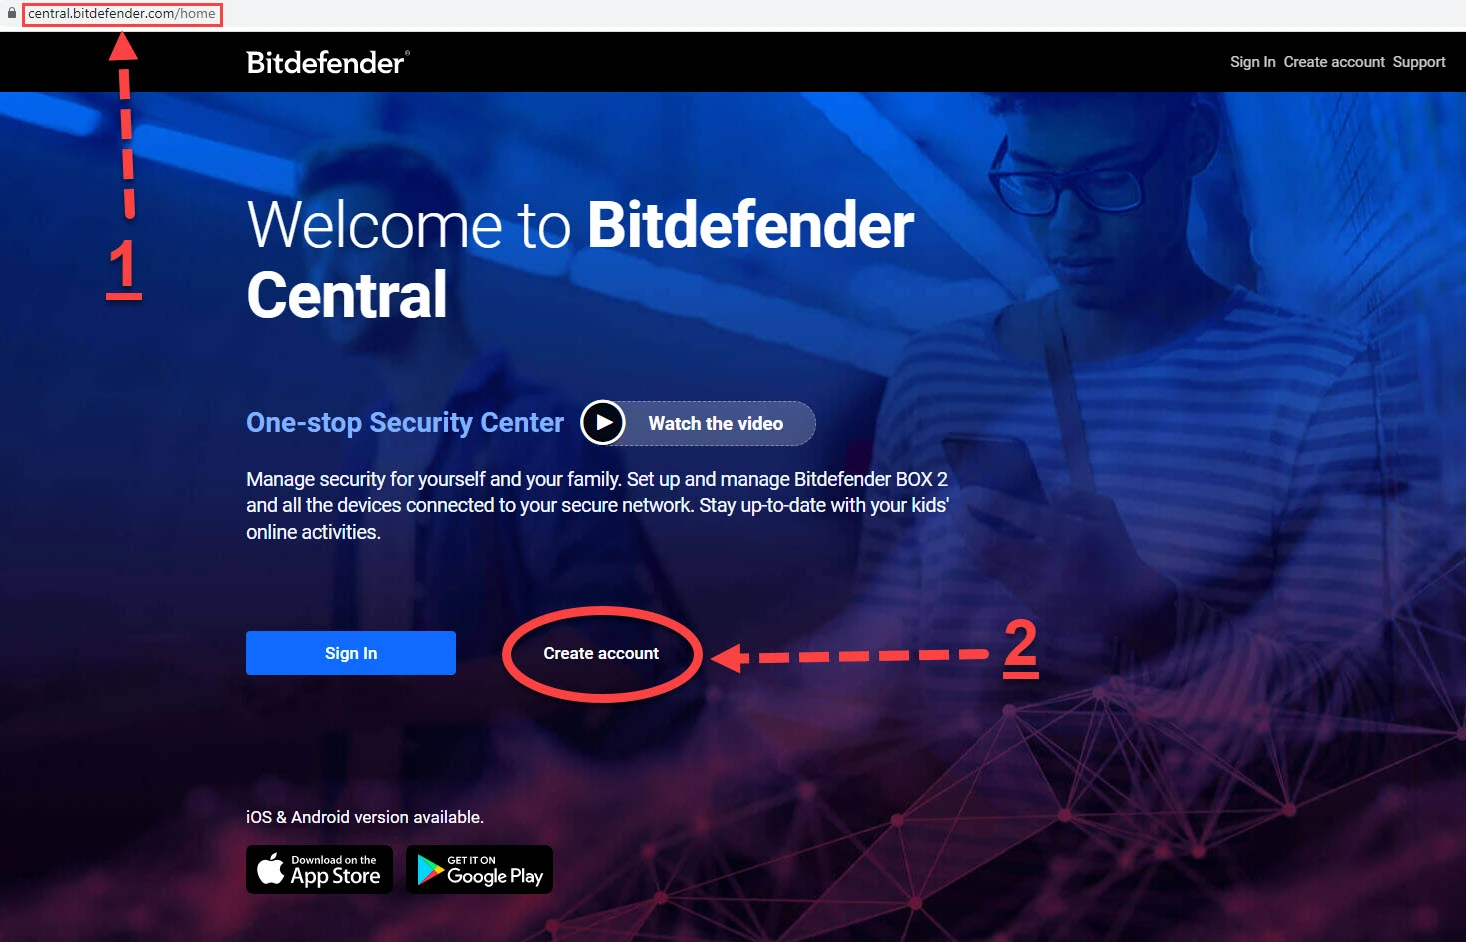
There are four simple steps for creating an account on the central Bitdefender platform, which efficiently manages all your devices wherever they are.
1. First, open this URL: www.central.bitdefender.com
2. Then, press the create account button.
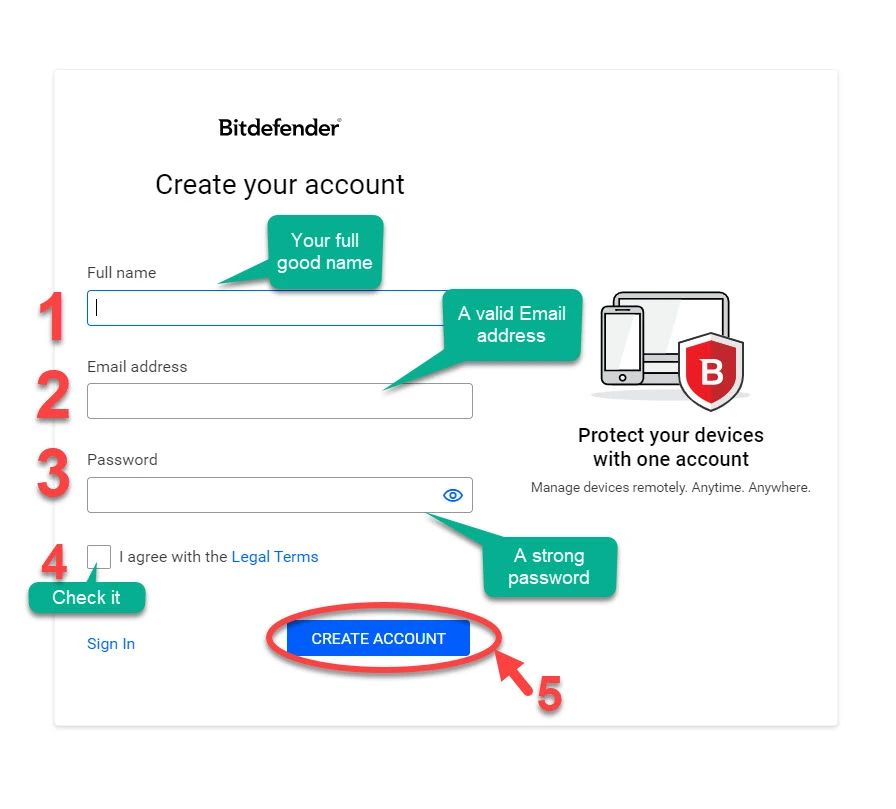
3. After that, on the new page, fill in all three blank fields with your good full name, your valid email address, and a strong password, respectively. Next, confirm your agreement with Legal Terms by checking the option, just like the below image.
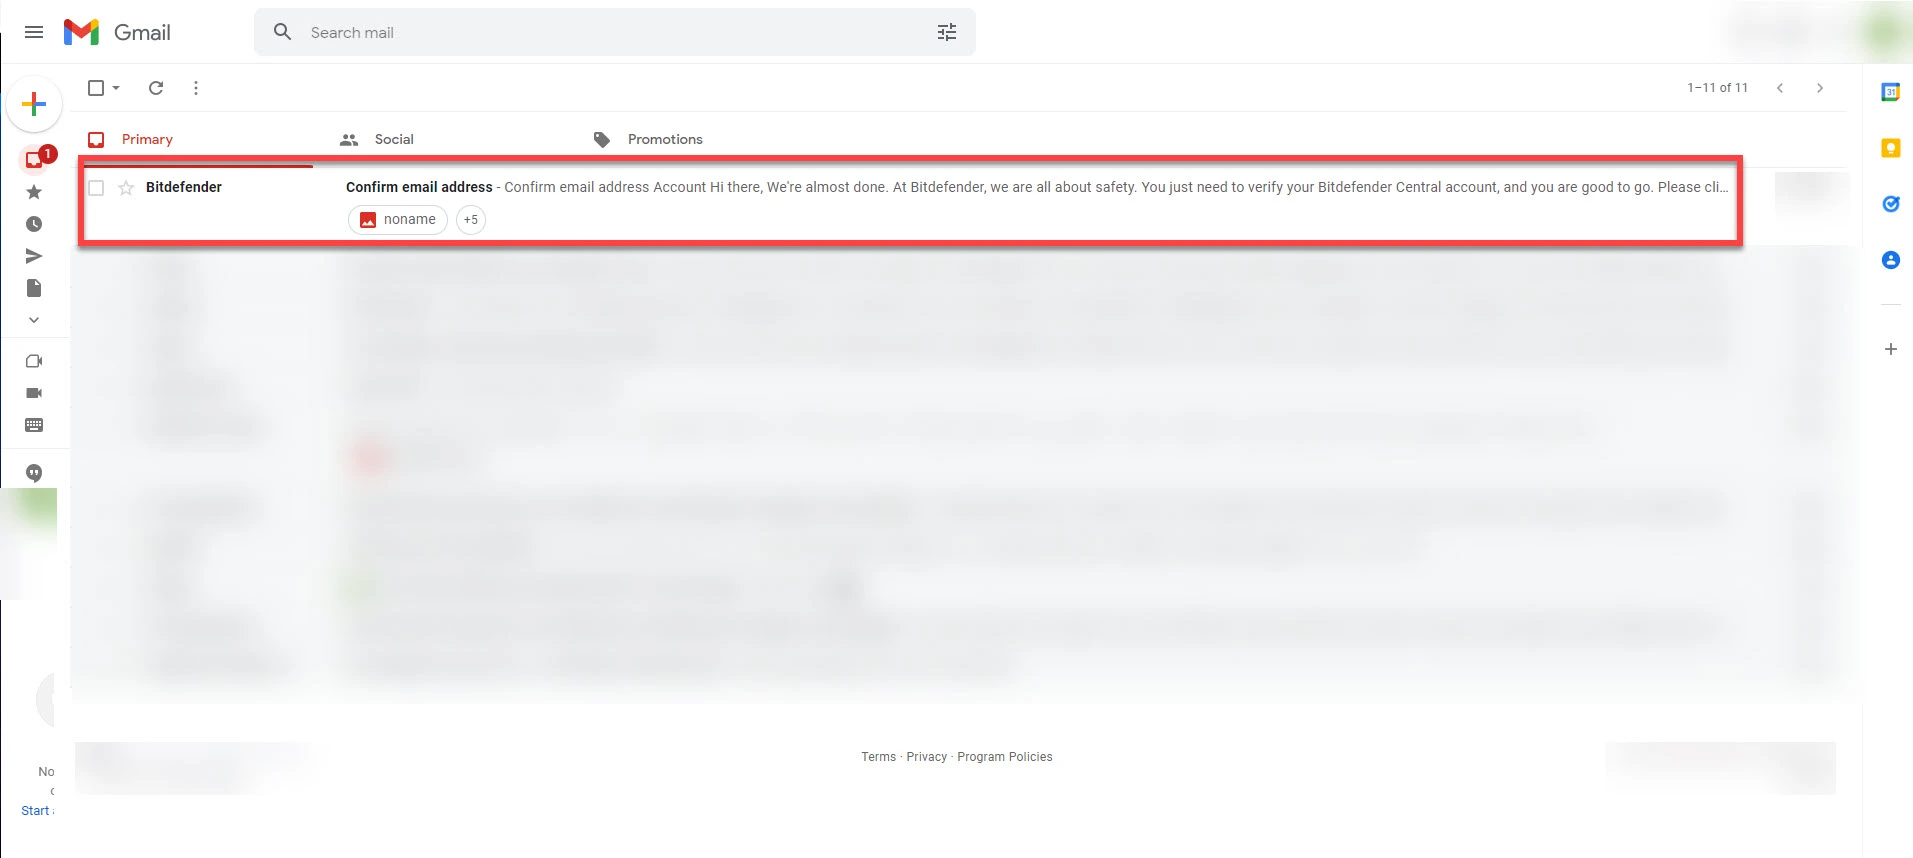
4. At this time, you’ll receive a confirmation E-mail, just check your inbox.
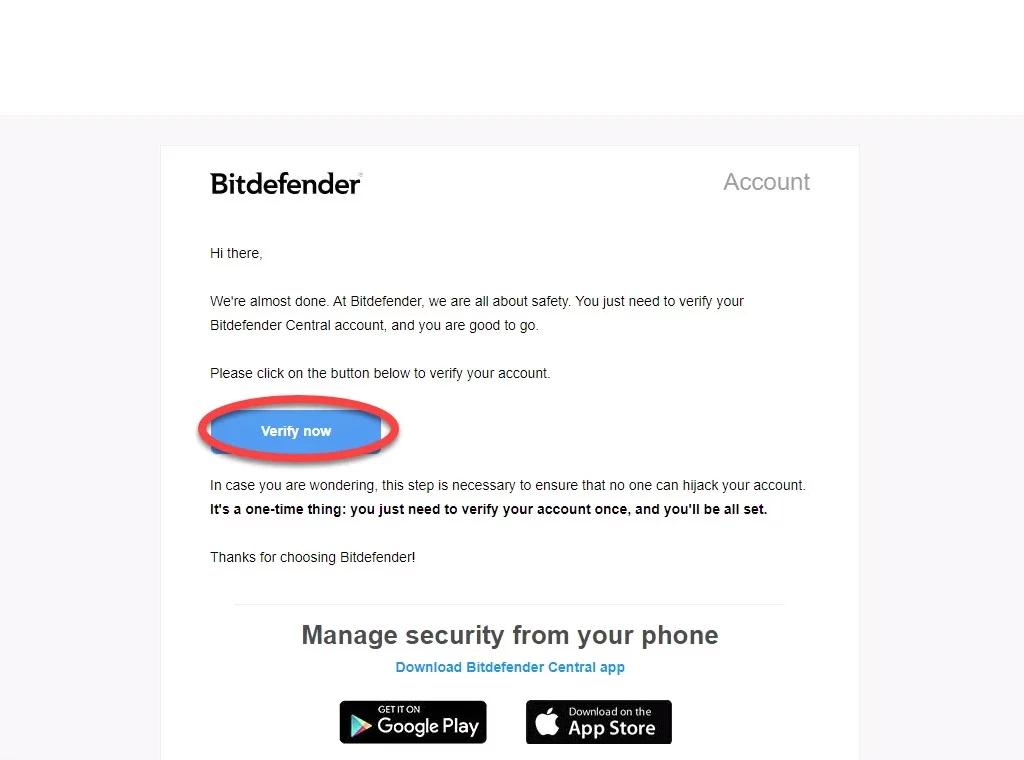
5. Finally, click on the Verify Now button. Then, you’ll be redirected to your central Bitdefender account.

Enjoy it!
Step 2: Activate Your Subscription on Bitdefender Central
To begin the process, you must have a valid email address (of course, you already have one!). Then, follow the steps below:
1. Head over to central.bitdefender.com and create a new account. If you already have an account, skip registration for a new account.
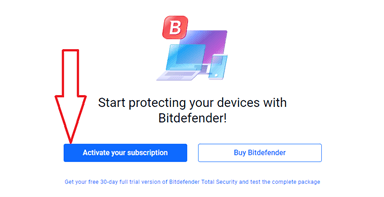
2. Activate your subscription. If you have no active subscriptions in your Bitdefender central account, the system asks you to activate it upon login. To do so, click on the Activate your subscription button.
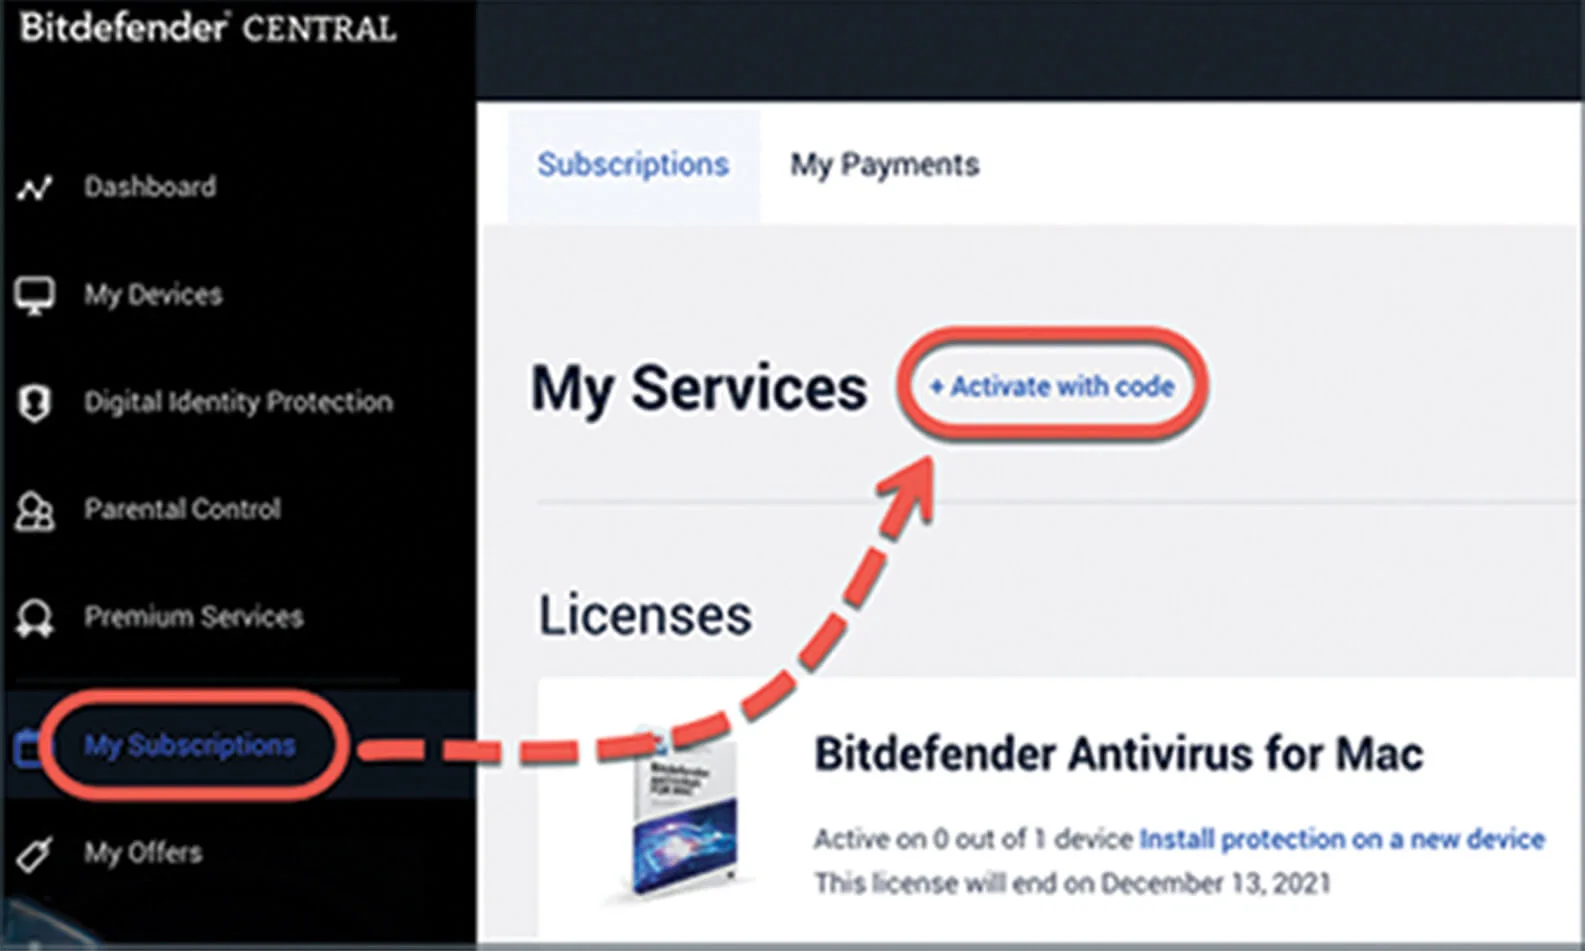
In case you already have a subscription, under the My Subscriptions tab on the sidebar, click +Activate with code.
3. Next, you’ll see a pop-up window requesting code. Enter the code you’ve received from us in your inbox after order confirmation and press the Activate button.

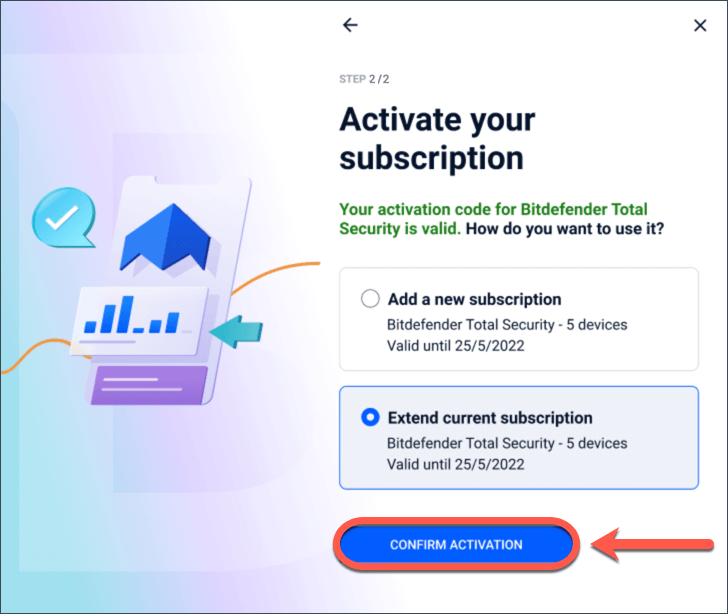
4. Now you should decide how to use your one-time code. You can either add a new subscription or extend an existing one. Then click on the CONFIRM ACTIVATION button.
Well done! You have successfully activated your subscription. Afterward, a pop-up window appears for downloading the product. Else, you can proceed to the next step for product installation.
Step 3: Install and Activate Bitdefender Products
To install and activate the Bitdefender product, open your Bitdefender Central account, then follow these steps:
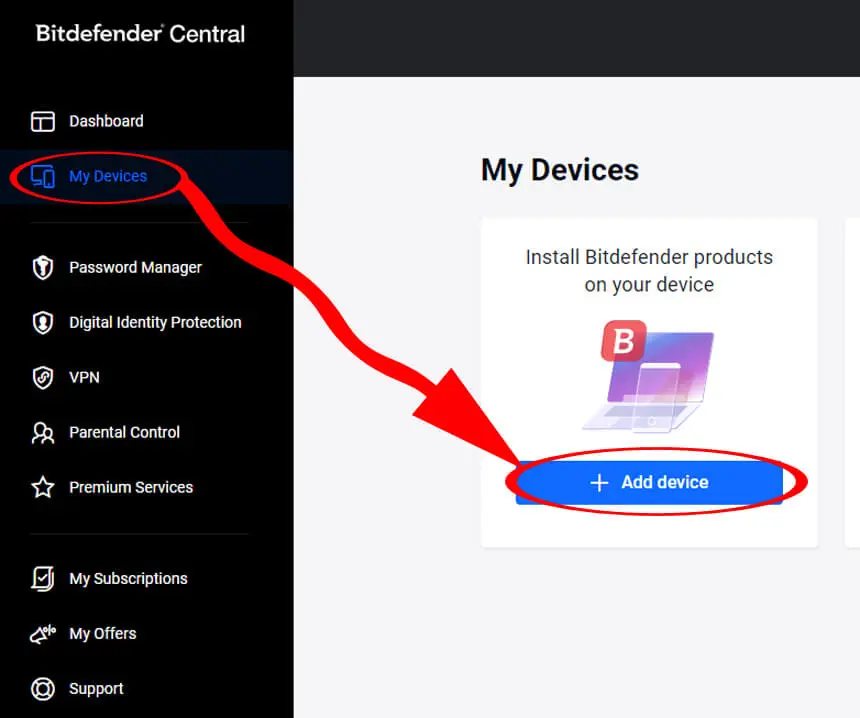
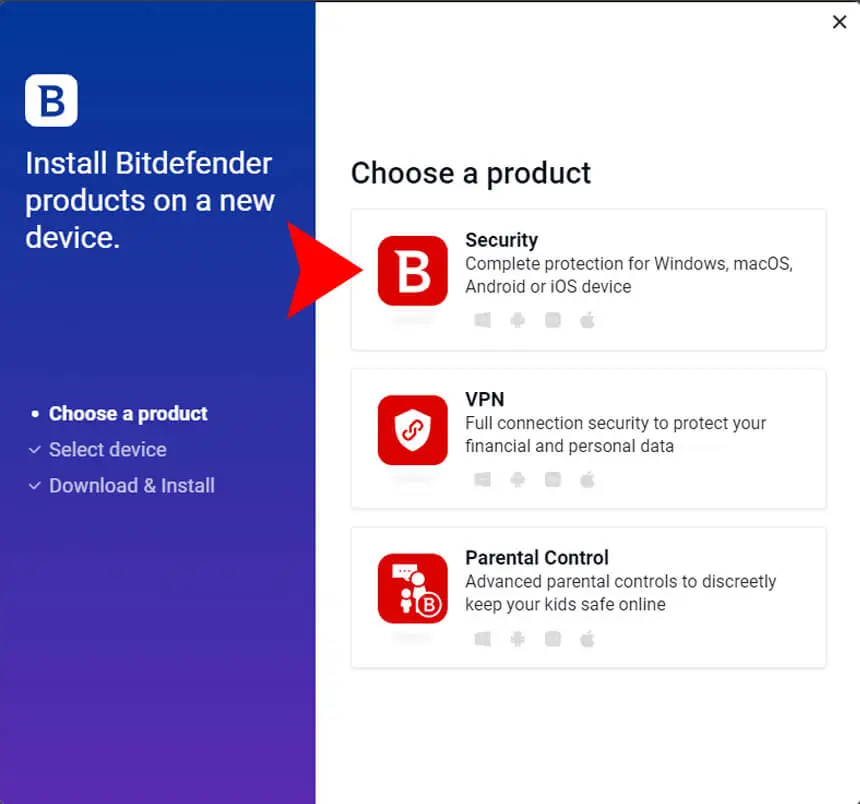
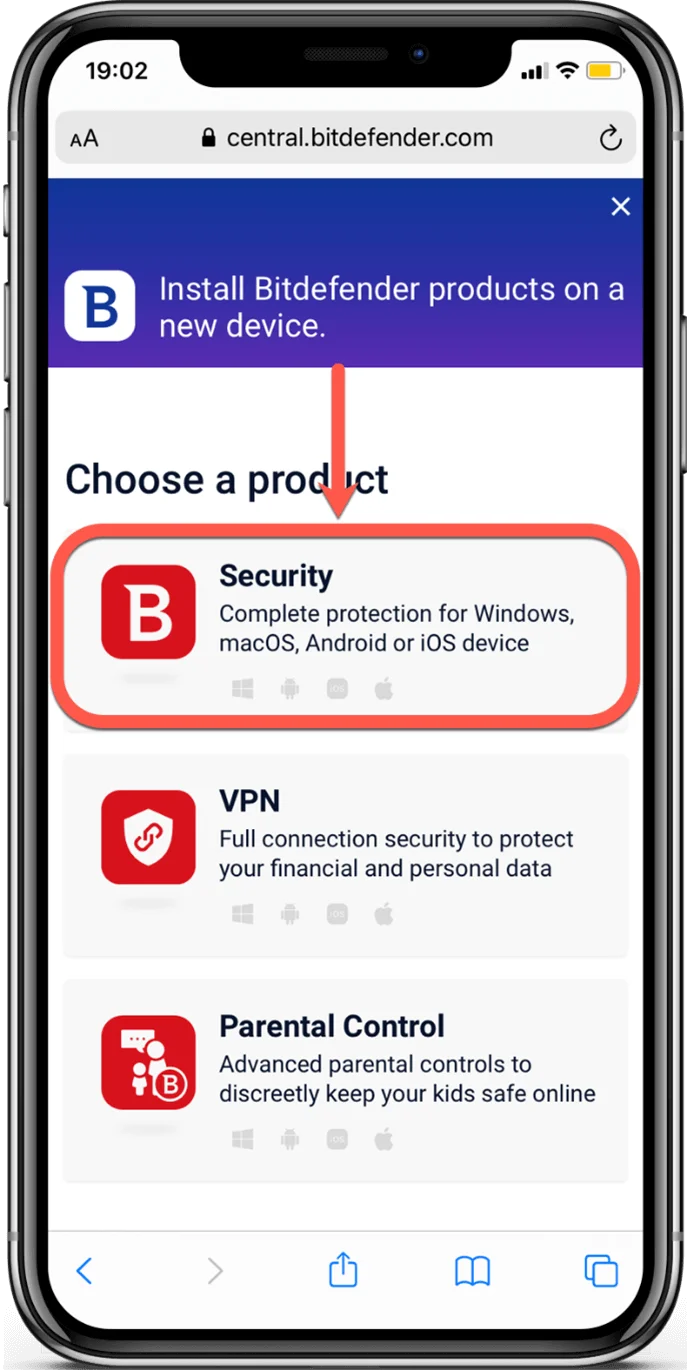
1. Select My Devices on the sidebar, and click the + Add device button.
2. Choose Security.
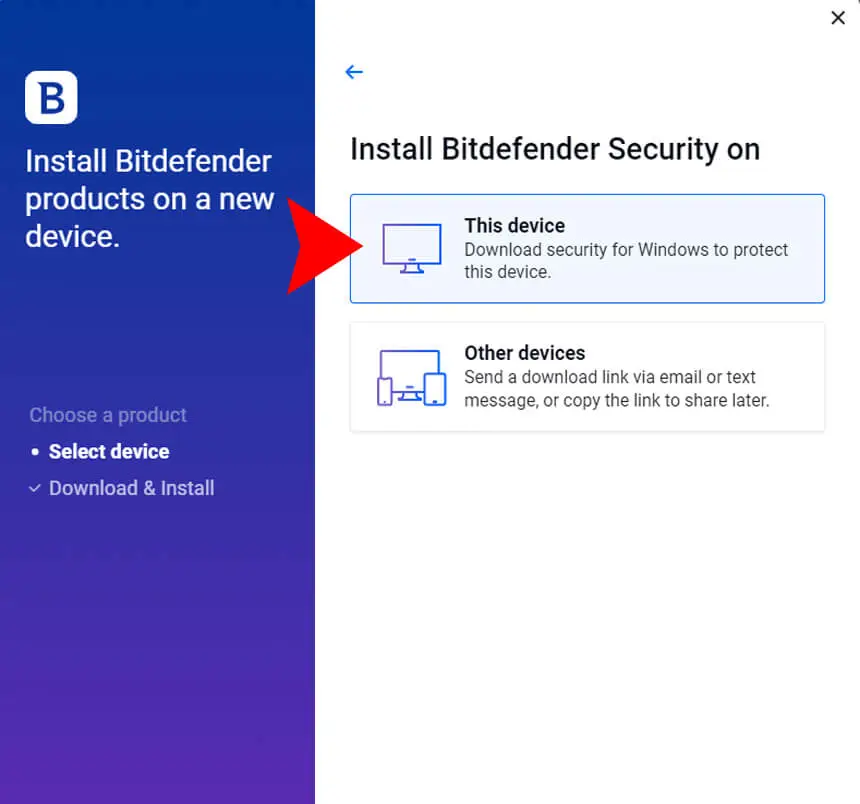
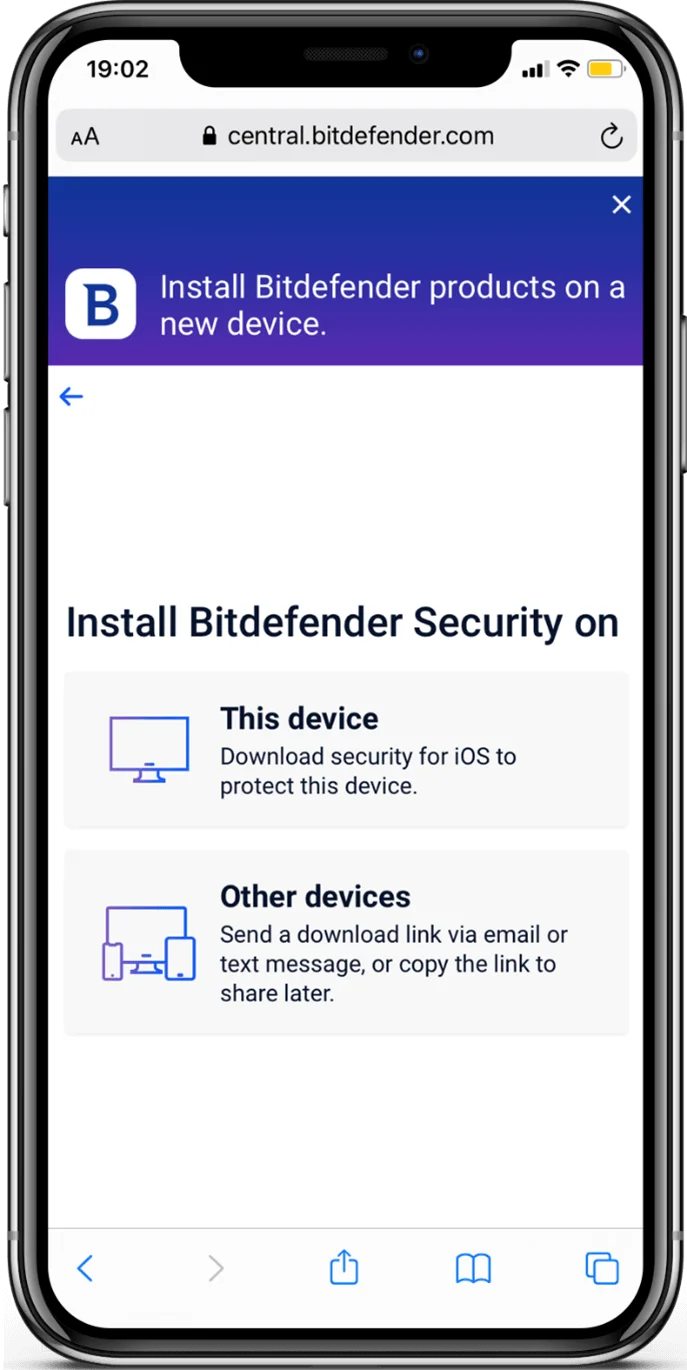
3. Now, select This device to install Bitdefender on your current OS. Otherwise, you can choose another option to send a download link to another device.
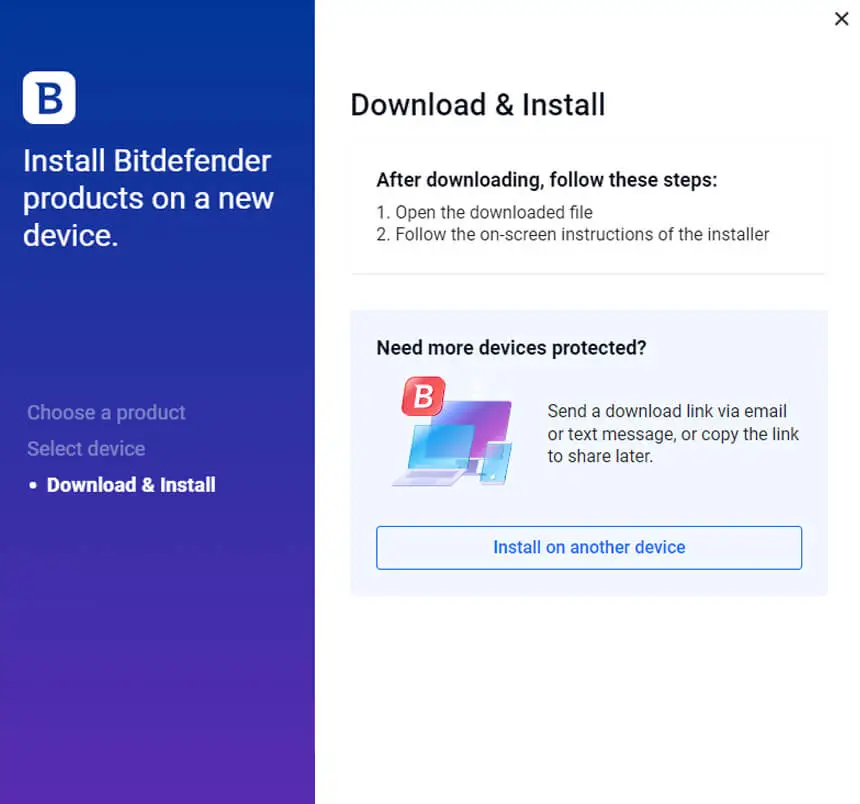
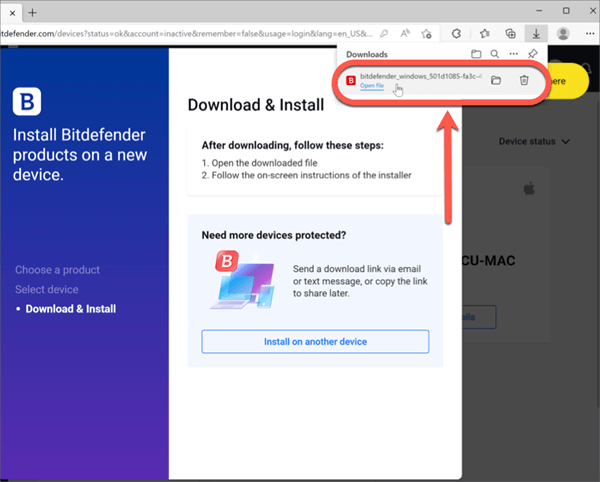
Finally, after the download finishes, open the file and follow the on-screen instructions of the installer.
Enjoy! This is the moment our duty as a defender begins.
How to Activate Bitdefender on Windows?
Depending on your chosen product, you should follow different procedures for installation. This section talks about installing Bitdefender on Microsoft Windows, which in particular includes Internet Security, Antivirus Plus, Family Pack, and Total Security.
1. After downloading the Windows installation file, open it.
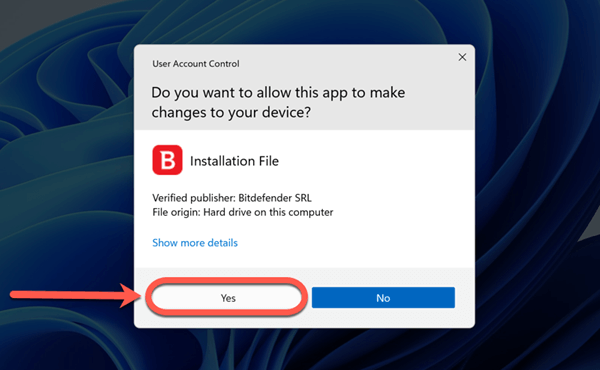
2. Select Yes on the User Account Control dialogue, and allow the installation file to make changes on your device.
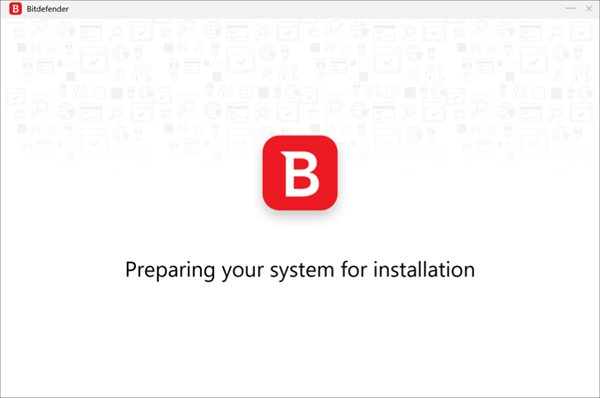
3. Next, you’ll see a window as below. Depending on your system and internet speed, it could take a while to finish.
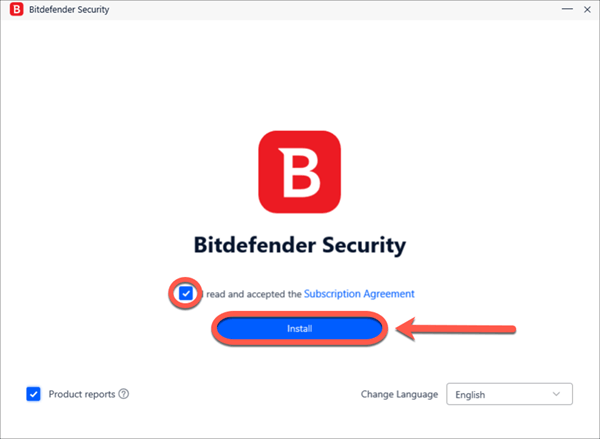
4. Wait for the dialog box below to appear on your screen. As an option, by using the drop-down menu in the bottom right corner, it is possible to change the language in which Bitdefender will be installed.
Click the Install button if you read and agree to the Subscription Agreement.
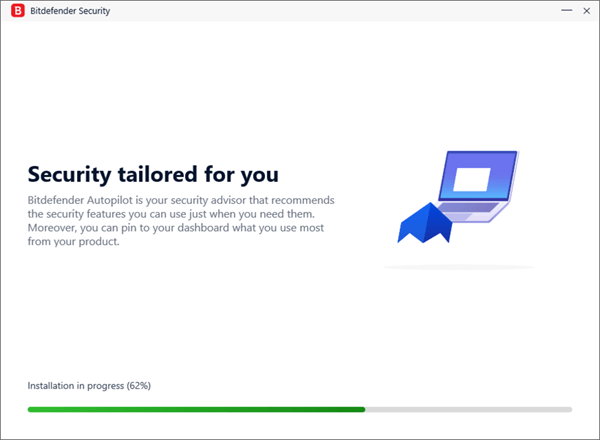
5. Please wait until the Bitdefender installation finishes.
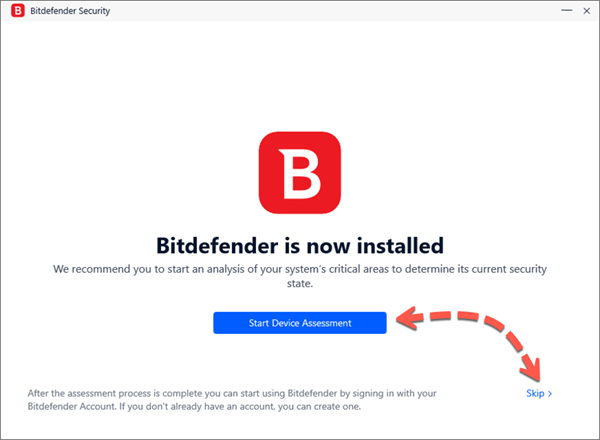
6. Once the Bitdefender installation is completed, the Start Device Assessment suggestion will appear. You can either click on it or simply skip it.
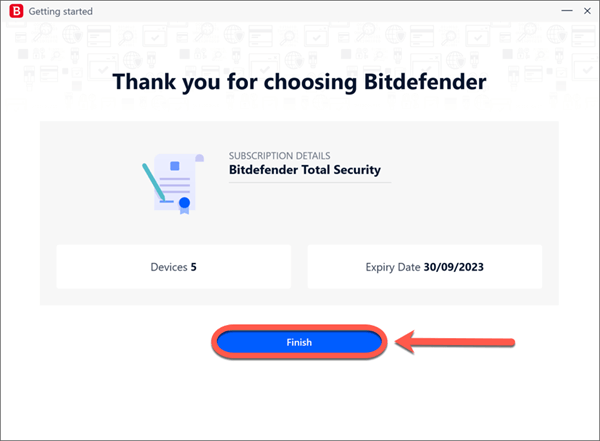
7. Finally, press the Finish button on the screen that shows your subscription details and let the Bitdefender interface open.
Congratulations! You have successfully installed Bitdefender on your Windows PC.
How to Activate Bitdefender on MAC?
While many users believe the MAC OS is pretty resilient to cybersecurity threats, the truth of the matter is different. MAC systems also demonstrate vulnerabilities to common and new security threats, making it an absolute necessity for users to equip their devices with the latest security solutions.
You can purchase Bitdefender Antivirus for MAC, Bitdefender Total Security, or Bitdefender Family Pack to enjoy this amazing product. To get started with it, follow these steps:
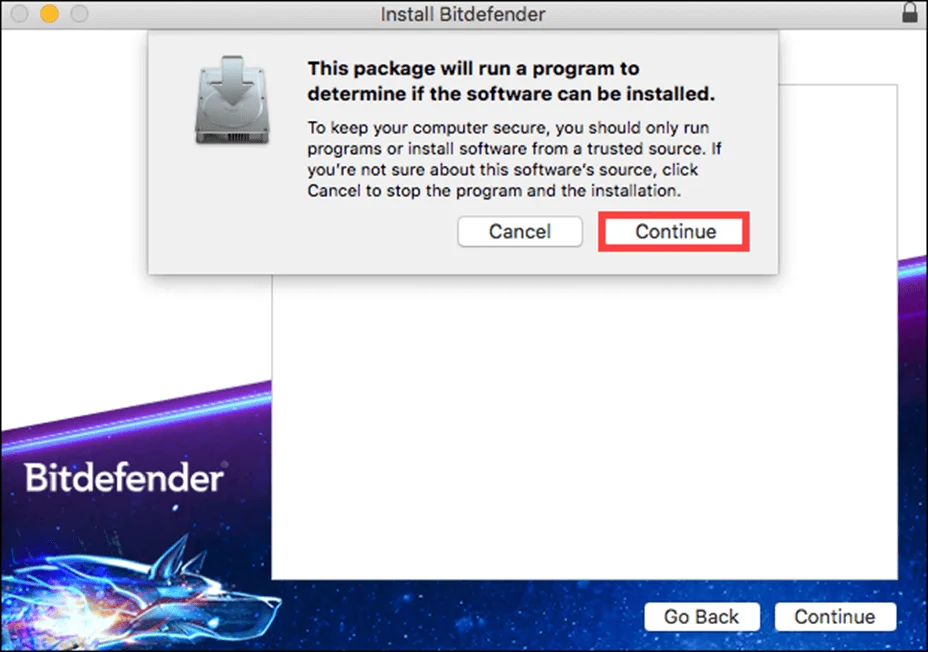
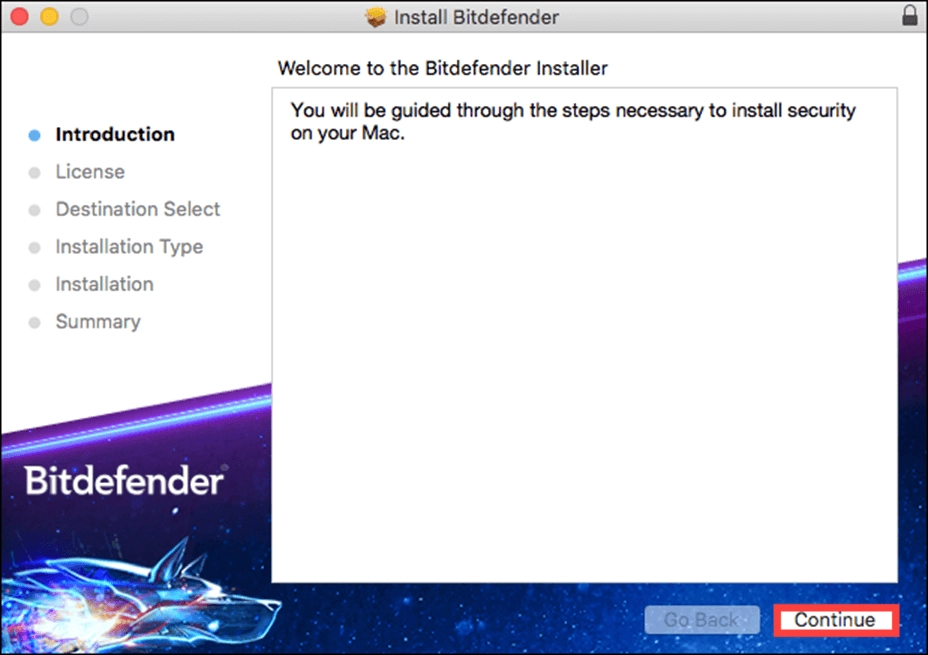
1. Run the Bitdefender file with the .pkg extension and follow the on-screen steps. Click Allow if prompted, and Continue.
2. To move forward with the installation, you will have to agree to the terms of the software Subscription Agreement.

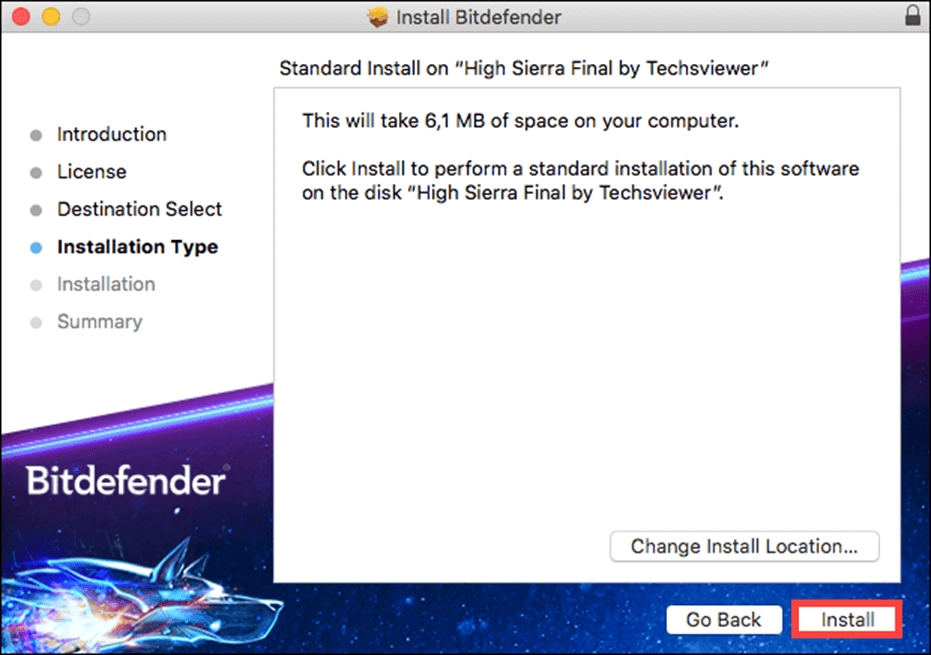
3. Select the location where you want to install the Bitdefender software, after that, click on Continue and select Install.
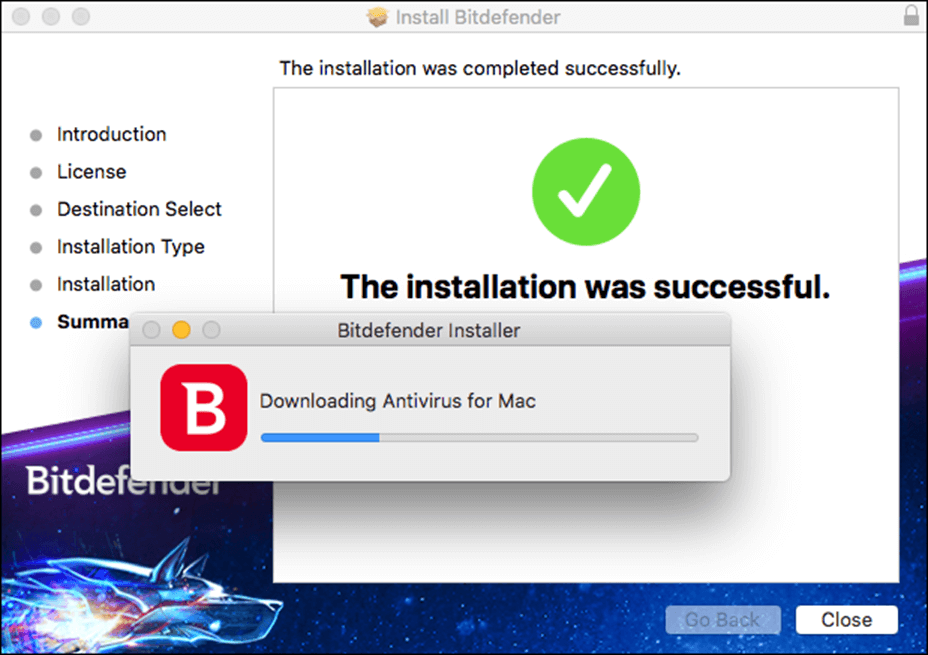
4. When asked, insert your username and password, and afterward, click the Install Software button.
5. A small window will appear for downloading Bitdefender Antivirus for Mac automatically and install on your device.
The installation is now complete if you have Yosemite (10.10), El Capitan (10.11), or macOS Sierra (10.12).
Otherwise, based on your macOS, continue one of the below instructions.
Installation of Bitdefender Antivirus on macOS High Sierra (10.13)
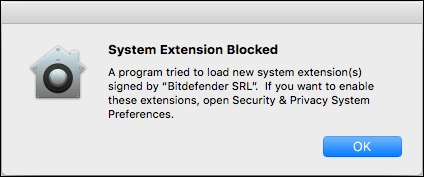
6. If you have High Sierra, you will be notified that a system extension signed by Bitdefender has been blocked. This is just a security check, not an error. Press OK.
Note: The notification pops up due to a new feature presented by High Sierra. This feature enforces that only kernel extensions (KEXT) confirmed by the user will be loaded on a system. When a request is made to load an extension that the user has not yet approved, the request is denied, and macOS displays an alert similar to the one shown below.
7. The setup assistant will show a window telling the next steps. Click on System Preferences > Security & Privacy > General, as shown below.
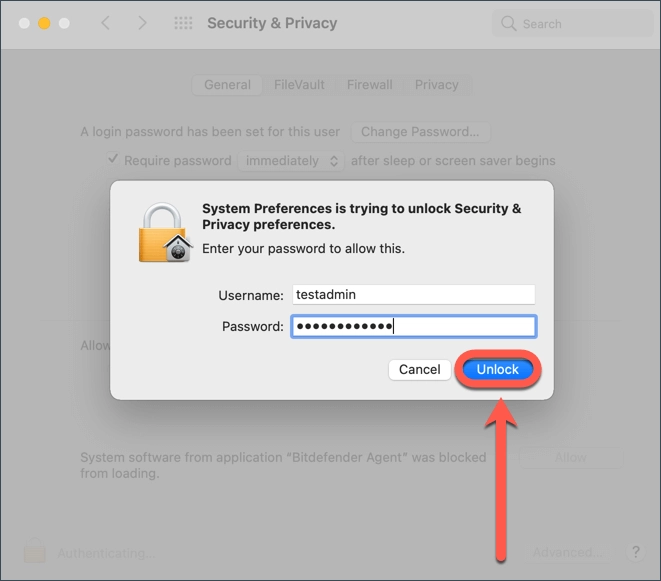
8. The Security & Privacy window will appear on your screen afterwards. Click the padlock icon in the bottom left corner to make the changes.

9. While prompted, input an administrator name and password and click Unlock.
10. Press the Allow button in the lower part of the window.

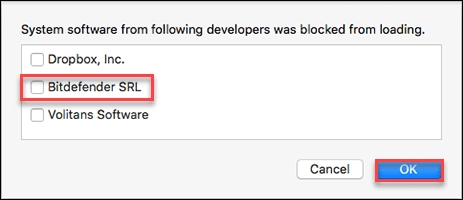
Note: If more than one system software requires your attention, select Bitdefender in the list, then click OK to allow it.
All done! You have successfully installed Bitdefender Antivirus for Mac on High Sierra!
Installation of Bitdefender Antivirus on macOS Mojave (10.14) up to Monterey (12)
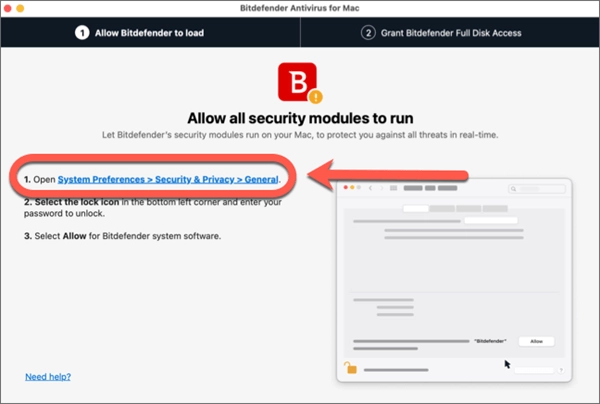
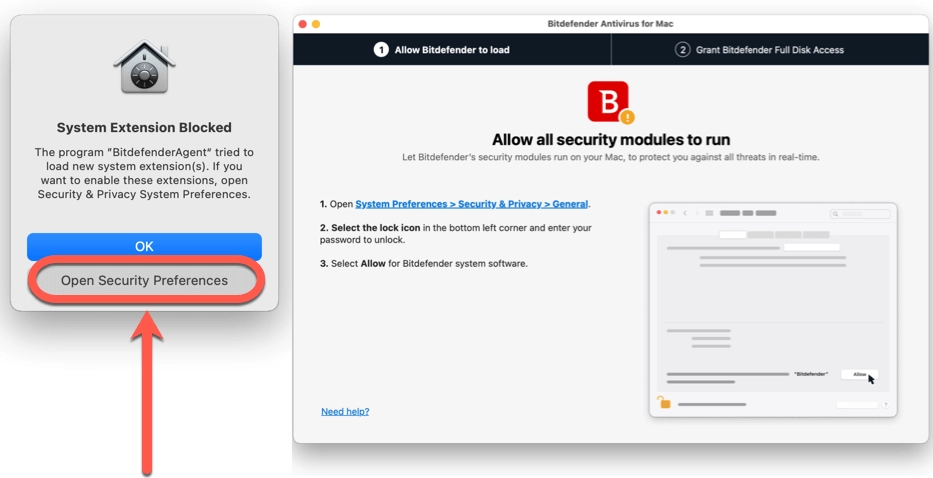
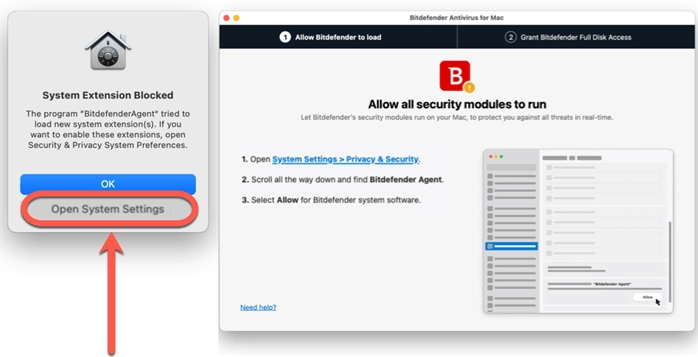
11. If your Mac is using macOS Mojave (10.14), Catalina (10.15), Big Sur (11), or Monterey (12), you will be shortly notified that a system extension signed by Bitdefender has been blocked. However, this is just a security check, not an error.
Select Open Security Preferences in the small pop-up window.
12. This will open the Security & Privacy window. Click the padlock icon in the bottom left corner to make the changes.
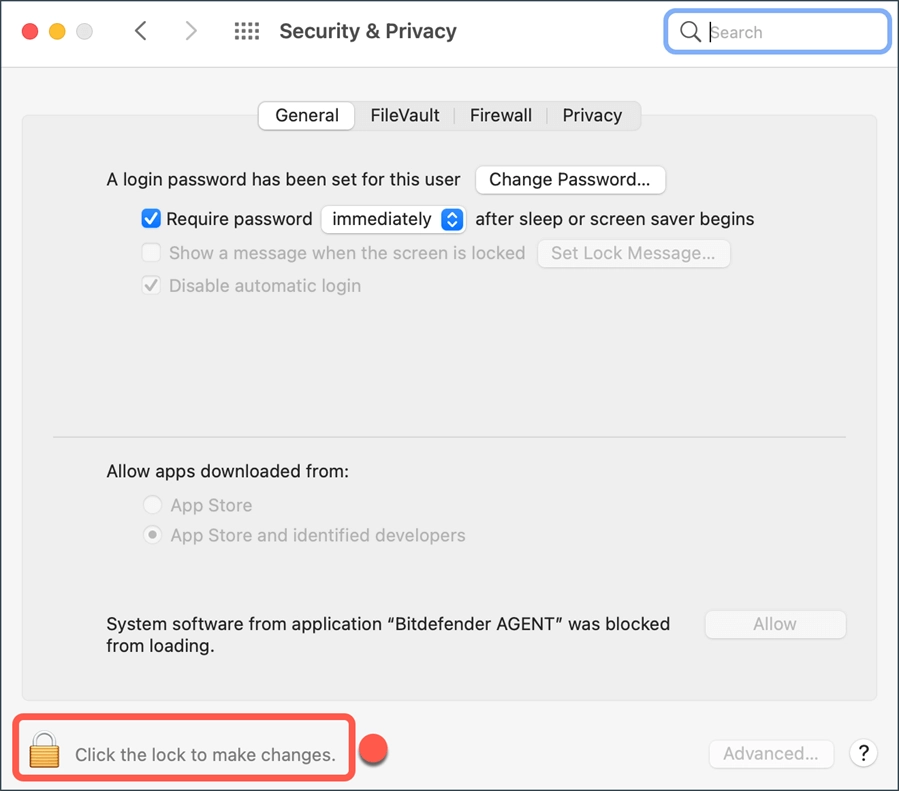
13. While prompted, input an administrator name and password and click Unlock.
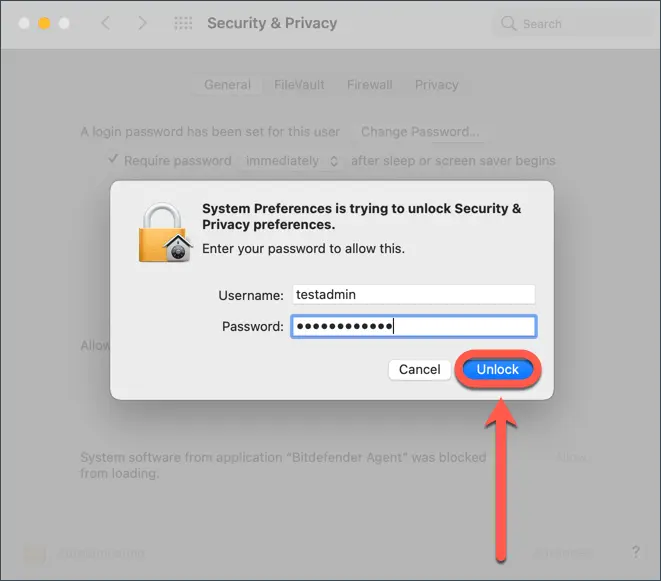
14. Press the Allow button in the lower part of the window.
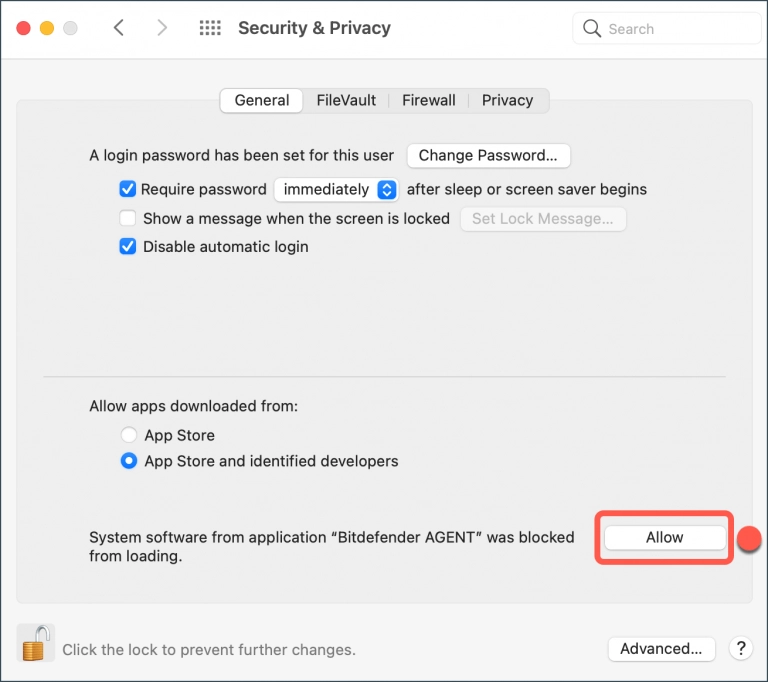
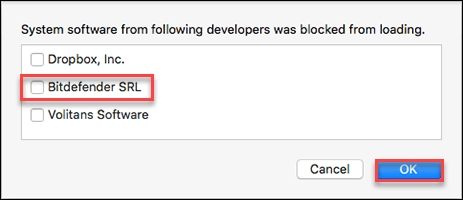
Note: If more than one system software requires your attention, select Bitdefender in the list, then click OK to allow it.
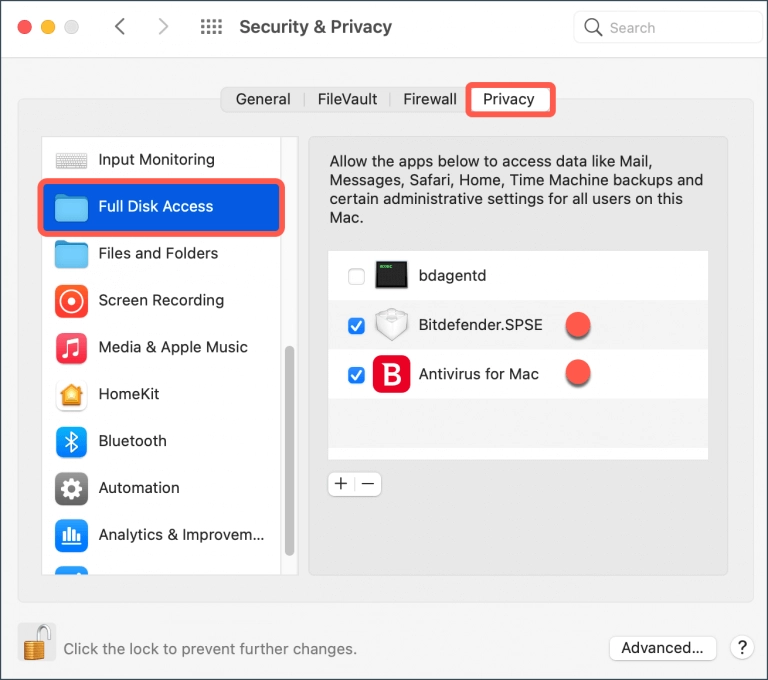
15. Now open the Privacy tab in the Security & Privacy window and select Full Disk Access on the sidebar as can be seen.
16. Check the box in front of these two Bitdefender entries in the list:
Bitdefender.SPSE
Antivirus for Mac
17. The following message appears: “Antivirus for Mac” will not have full disk access until it is quit. Press Quit & Reopen.
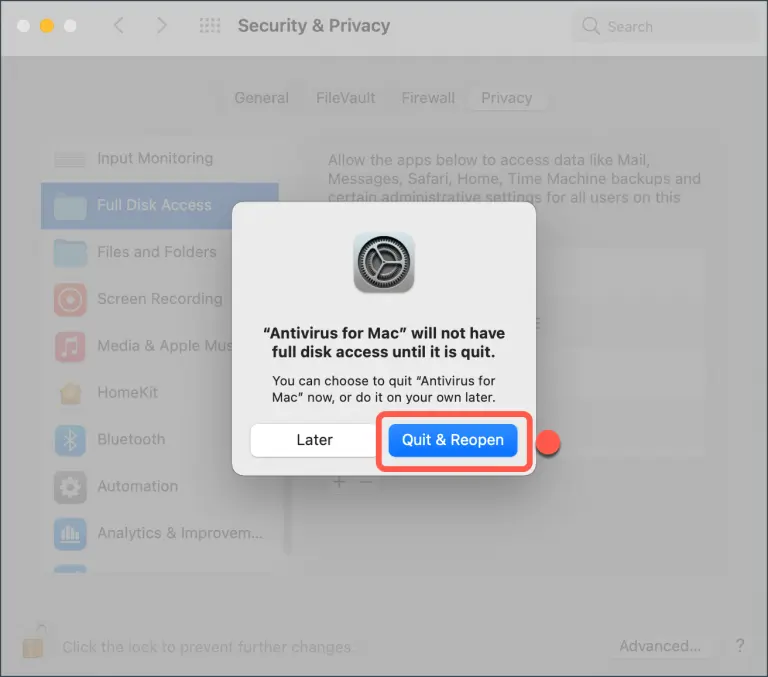
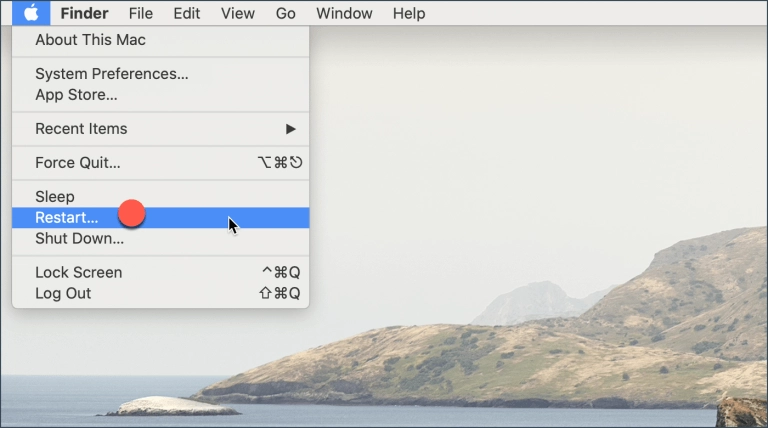
18. Restart your Mac to complete the setup process.
Done!
Installation of Bitdefender Antivirus on macOS Ventura (13)
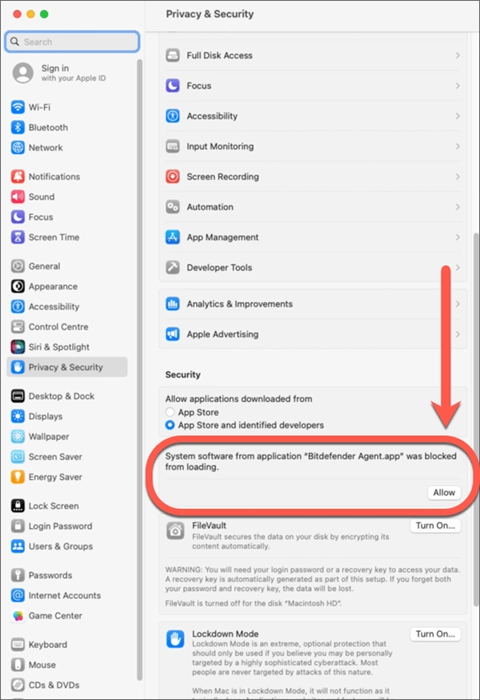
19. If your Mac uses macOS Ventura (13), you will particularly be notified that a system extension signed by Bitdefender has been blocked. This is not an error, just a security check. Click on Open System Settings.
20. The Privacy & Security window will appear. Scroll down to the Security section and click the Allow button.
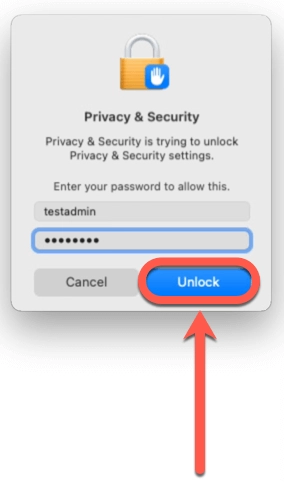
21. When prompted, enter an administrator name and password, and use Unlock button to move forward.
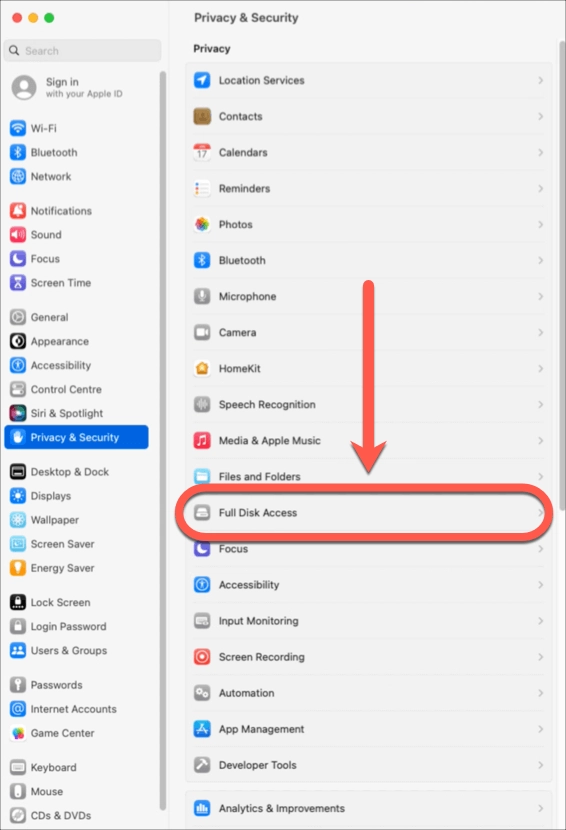
22. In the Privacy & Security window, scroll upward and click on Full Disk Access in the Privacy section.
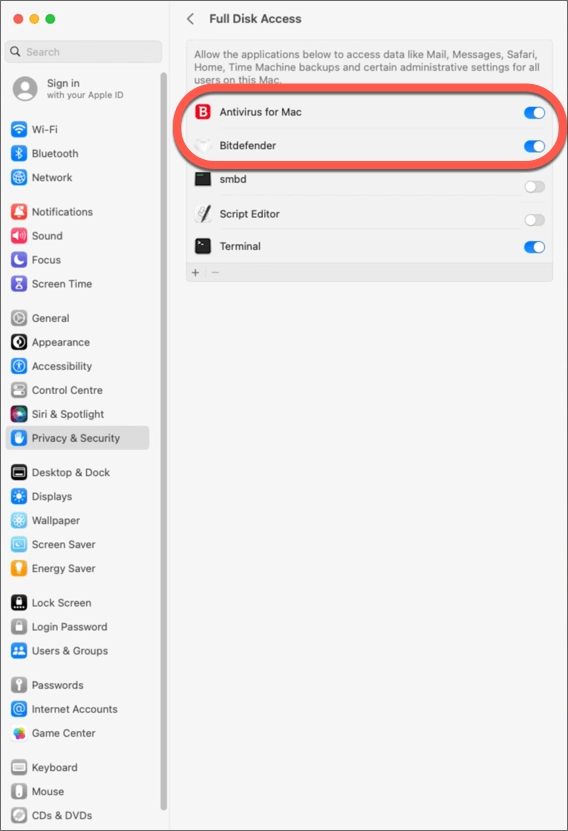
23. After that, in the list of applications that require full disk access, toggle to the on position (blue switch):
- Bitdefender
- Antivirus for Mac
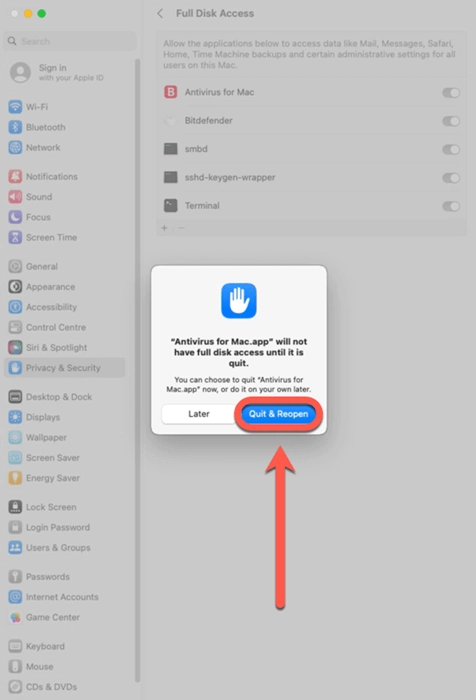
24. The following message shows: Antivirus for Mac.app will not have full disk access until it is quit. Press Quit & Reopen.
25. Restart your machine to complete the setup.
Installation of Bitdefender Antivirus for Mac on macOS Ventura is now complete.
How to Activate Bitdefender on Android?
Video Guide to Install Bitdefender Mobile Security
With more than 2.7 billion active users worldwide (as of September 2022), the global market share of 72% shows the widespread popularity of Android in all countries. From youngsters to grandparents and average users to tech-savvy individuals, the extensive use of this operating system paves the way for many threats if not enough effective security measures are implemented.
The necessity of Android security resulted in many cybersecurity solutions for mobile users, and Bitdefender Mobile Security surely stays the course in the best way. Here’s the guide to activating and running this product on your smart devices. It works on smartphones and tablets running Android 5 or later.
1. The simplest way to install Bitdefender Mobile Security on Android is indeed to download it from the Google Play Store. Open the Google Play app on your smartphone/tablet running Android.
2. Search for Bitdefender Mobile Security on Google Play. After finding the app, select it and tap ‘Install’ to download Bitdefender Mobile Security on your Android device.

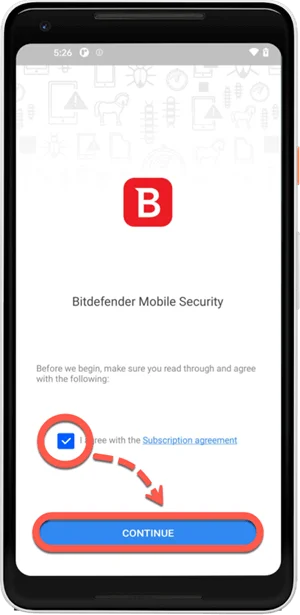
3. Once the download ends, open the Bitdefender Mobile Security app. Check the box next to ‘I agree with the Subscription agreement,’ and then press CONTINUE after you read and agree with the subscription terms.
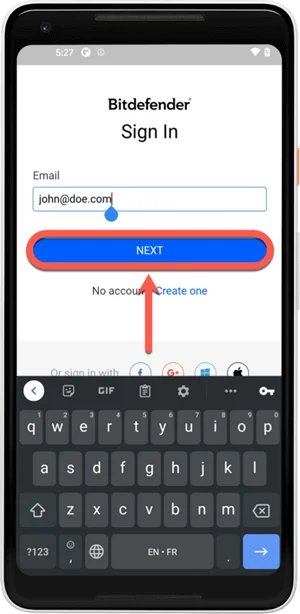
4. The next step would be to sign in to your Bitdefender Central account using your username and password.
Note: if you don’t have an account on the central.bitdefender.com platform, check the previous steps before moving forward.
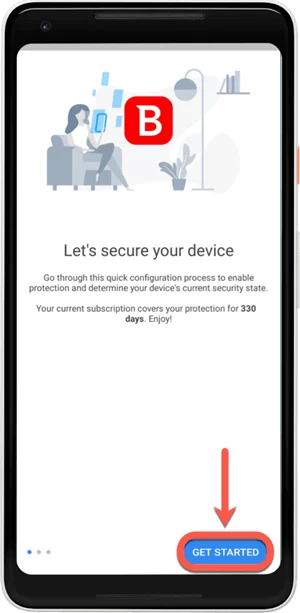
5. Tap GET STARTED on the bottom right of the configuration screen.
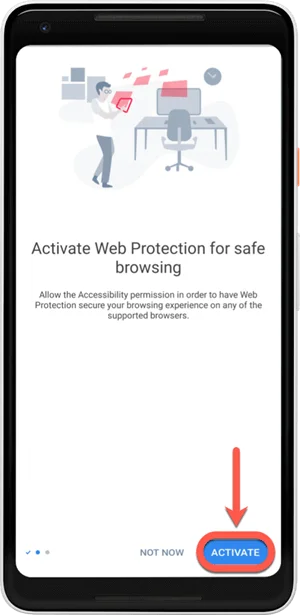
6. To complete the installation and secure your browsers, you must surely turn on the Web Protection feature in Bitdefender Mobile Security. Tap ACTIVATE.
7. In the Accessibility screen, tap the Bitdefender Mobile Security app.
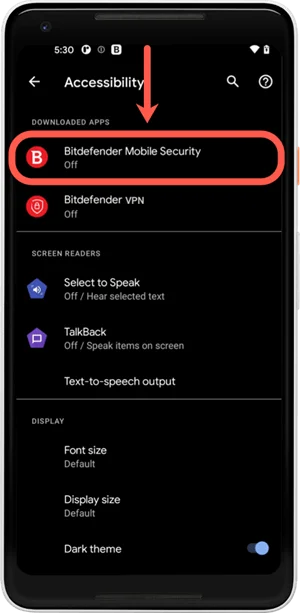
8. Toggle ‘Use Bitdefender Mobile Security’ to the on position.
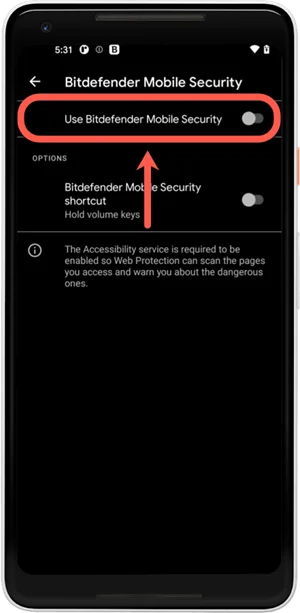
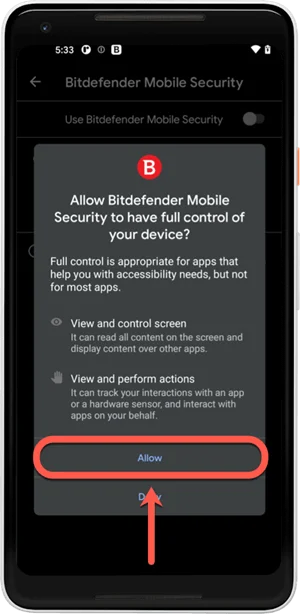
9. By using the ‘Allow’ button, confirm the action. The Accessibility Service is required. Therefore, Bitdefender can scan and block dangerous websites accessed in browsers.
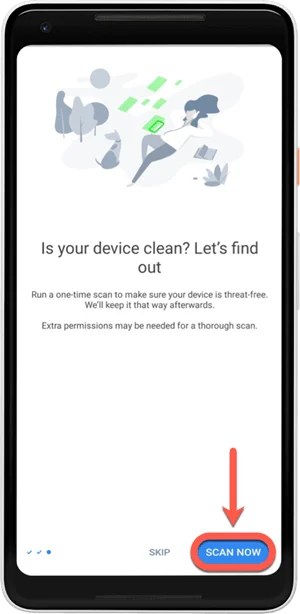
10. Go back to the installation screen, and you’ll have the possibility to scan your Android device for malware. Tap SCAN NOW. If you wish to perform the scan later, choose SKIP.
11. Allow Bitdefender to scan different file types on the device.

12. Bitdefender will begin scanning your apps. Wait until the scan finish.
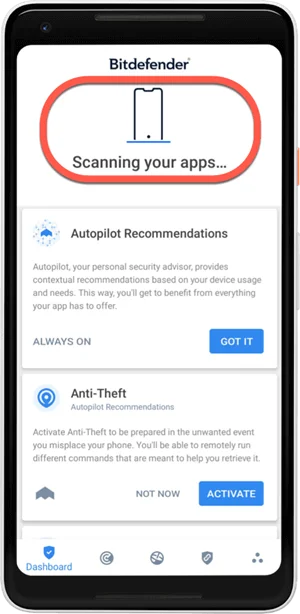
Bitdefender Mobile Security for Android is now installed and ready to protect your device.
How to Install Bitdefender Mobile Security for Android via Bitdefender Central?
Aside from downloading the app, you can also install the Bitdefender Mobile Security through your online account on Bitdefender Central. If you don’t have an account on the central.bitdefender.com platform, check the previous steps first.
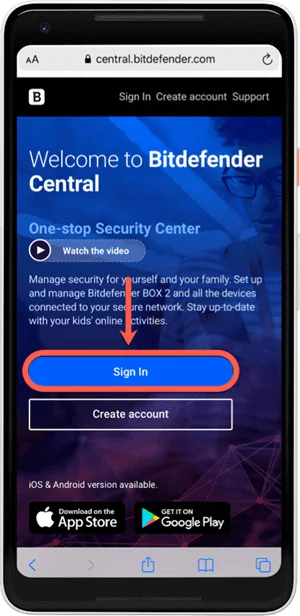
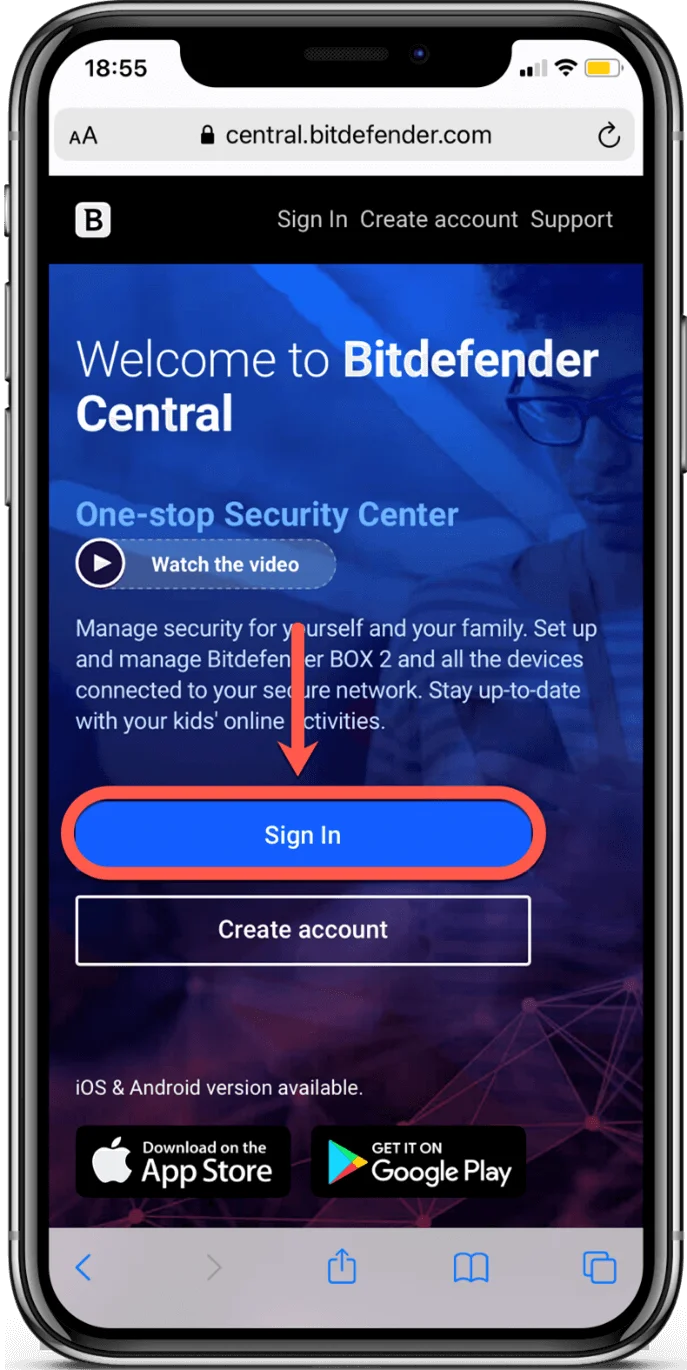
1. First of all, open a web browser on your mobile phone. Enter the https://central.bitdefender.com URL, and sign in to your Bitdefender Central account.
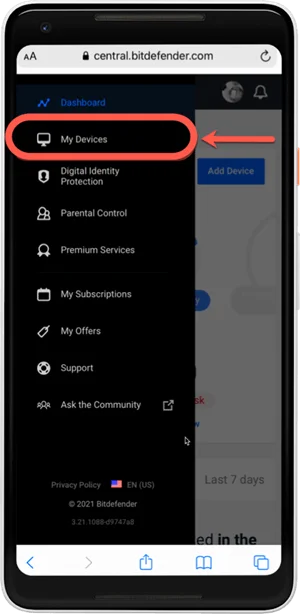
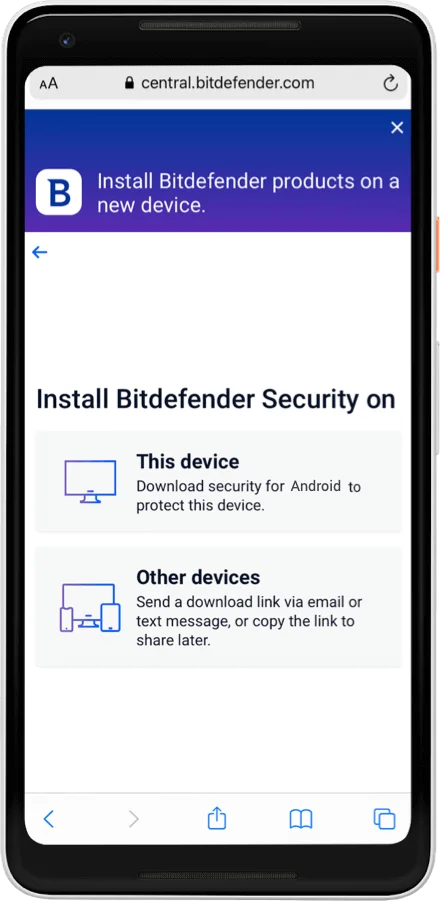
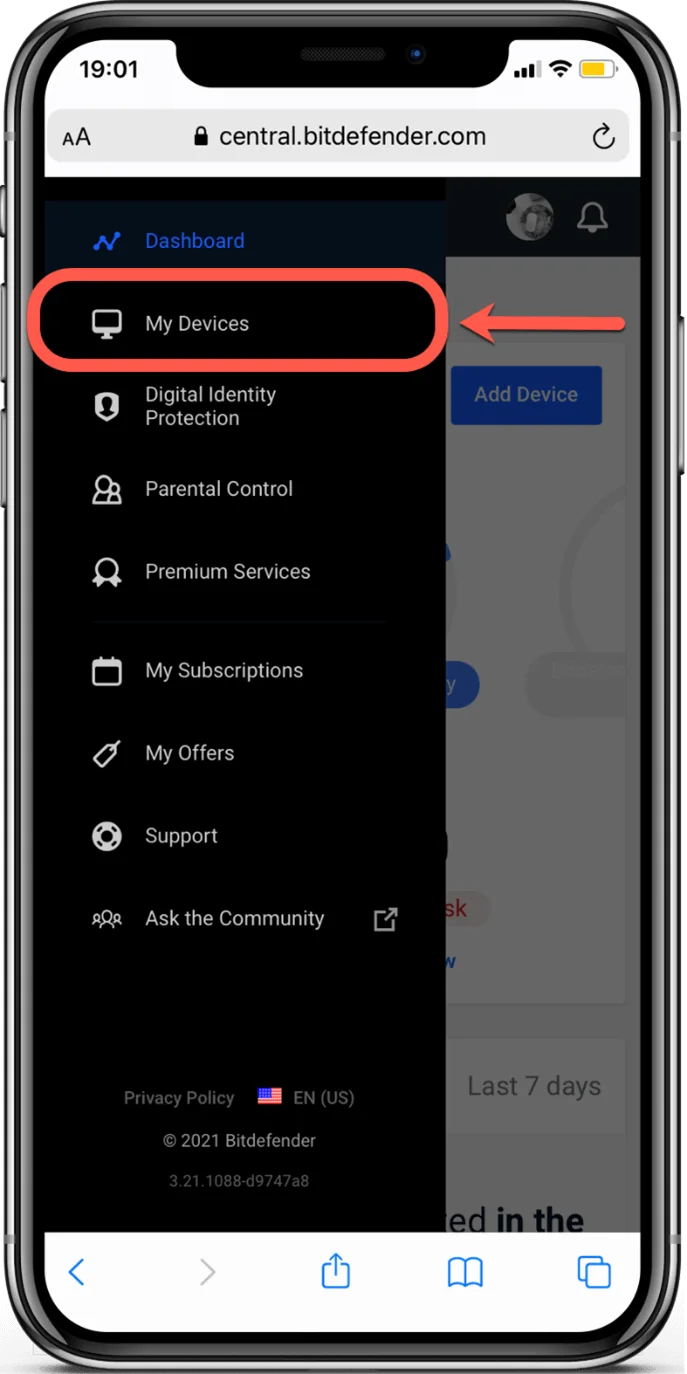
2. Tap the menu in the upper-left corner of the Bitdefender Central page to select ‘My Devices’.
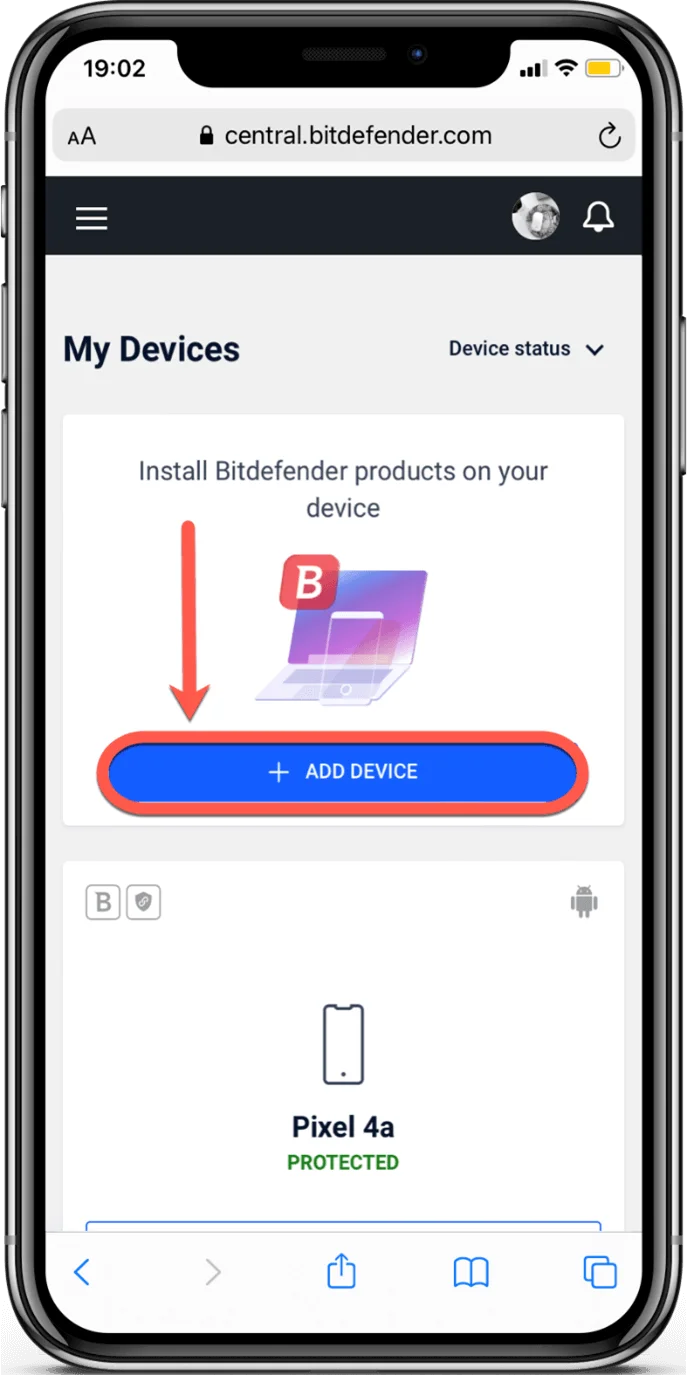
3. In the My Devices section, tap + ADD DEVICE.

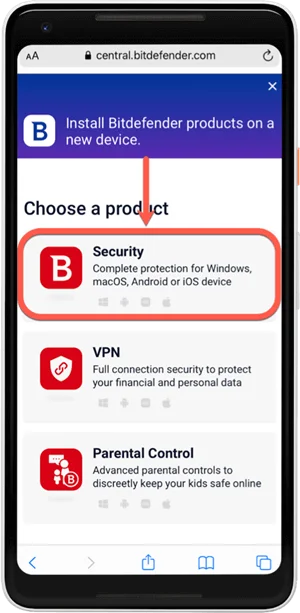
4. Choose Security in the selection screen.
5. At this point, if you access Bitdefender Central from the Android device you wish to protect, tap This device. You will be redirected to Google Play. If you access Bitdefender Central from another device, tap Other devices. You can then email a download link to your Android smartphone or tablet.
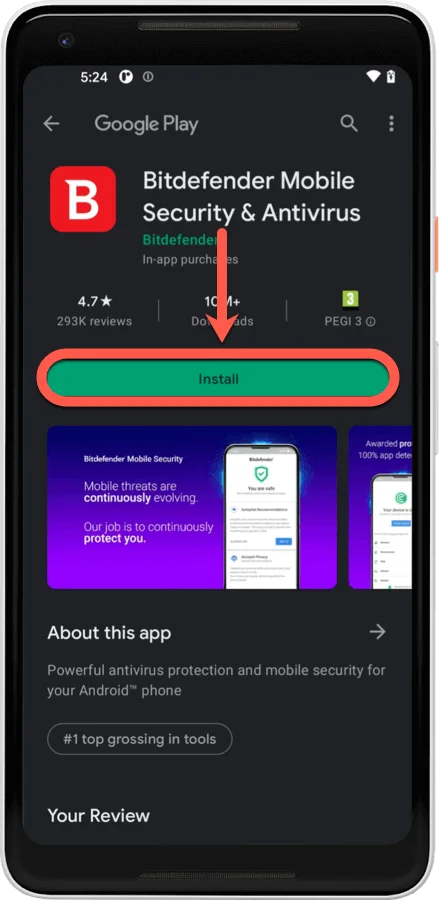
6. In both methods, you will be redirected to Google Play. Tap the ‘Install’ button to download Bitdefender Mobile Security for Android.
7. Once the download ends, open the Bitdefender Mobile Security app. Check the box next to ‘I agree with the Subscription agreement,’ and press CONTINUE after you read and agree with the subscription terms.
Bitdefender Mobile Security for Android is now installed and ready to protect your device.
How to Activate Bitdefender Mobile Security on iOS?
Apple phones are usually considered to be secure on their own. But as the cybersecurity threats get more rampant, iOS users also get more prone to scams and data loss since it’s not impossible for cybercriminals to hit these devices. So iPhone and iPad owners should be aware of the potential threats and equip their devices with an appropriate app like Bitdefender Mobile Security to stay safe.
It’s worth mentioning that Bitdefender Mobile Security for iOS works on any devices running iOS 12 or later and needs an internet connection to be activated. To get started with this top-ranking app on your iOS devices, you have two options:
A. Install Bitdefender Mobile Security for iOS from the App Store
The simplest way to get Bitdefender Mobile Security for iOS is to download it from the App Store.
1. Open the App Store app on your iPhone or iPad.
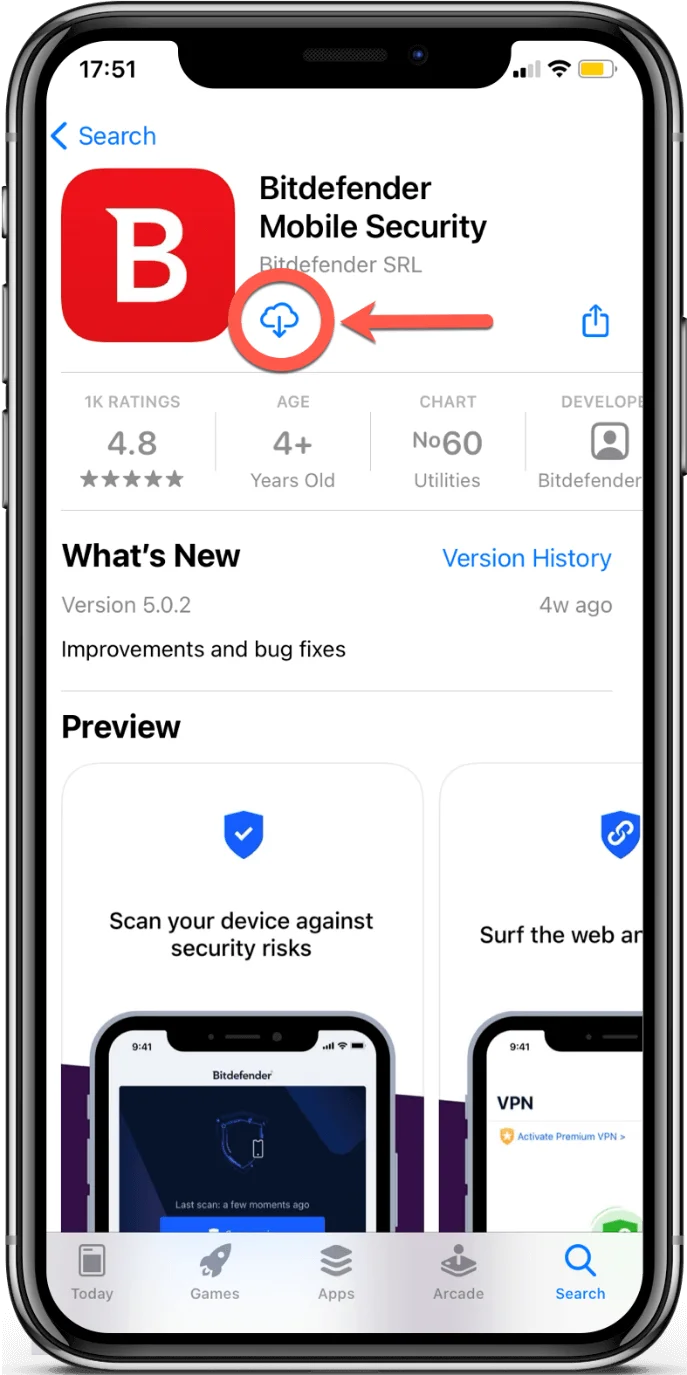
2. Search for Bitdefender Mobile Security on the App Store. After finding the app, tap the cloud icon with an arrow pointing down to download Bitdefender Mobile Security for iOS.
3. When the download completes, open the Bitdefender Mobile Security app and tap Get started on the welcome screen.

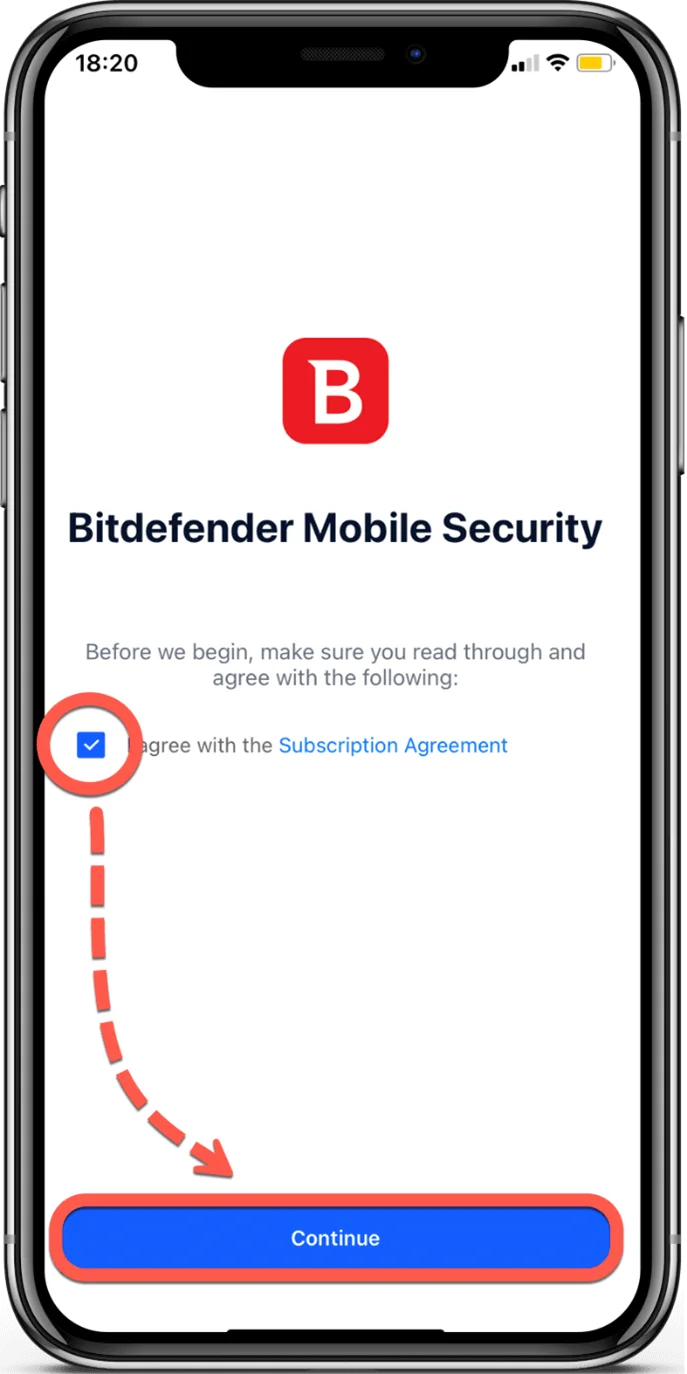
4. Check the small box and select Continue after you read and agree with the Subscription Agreement.
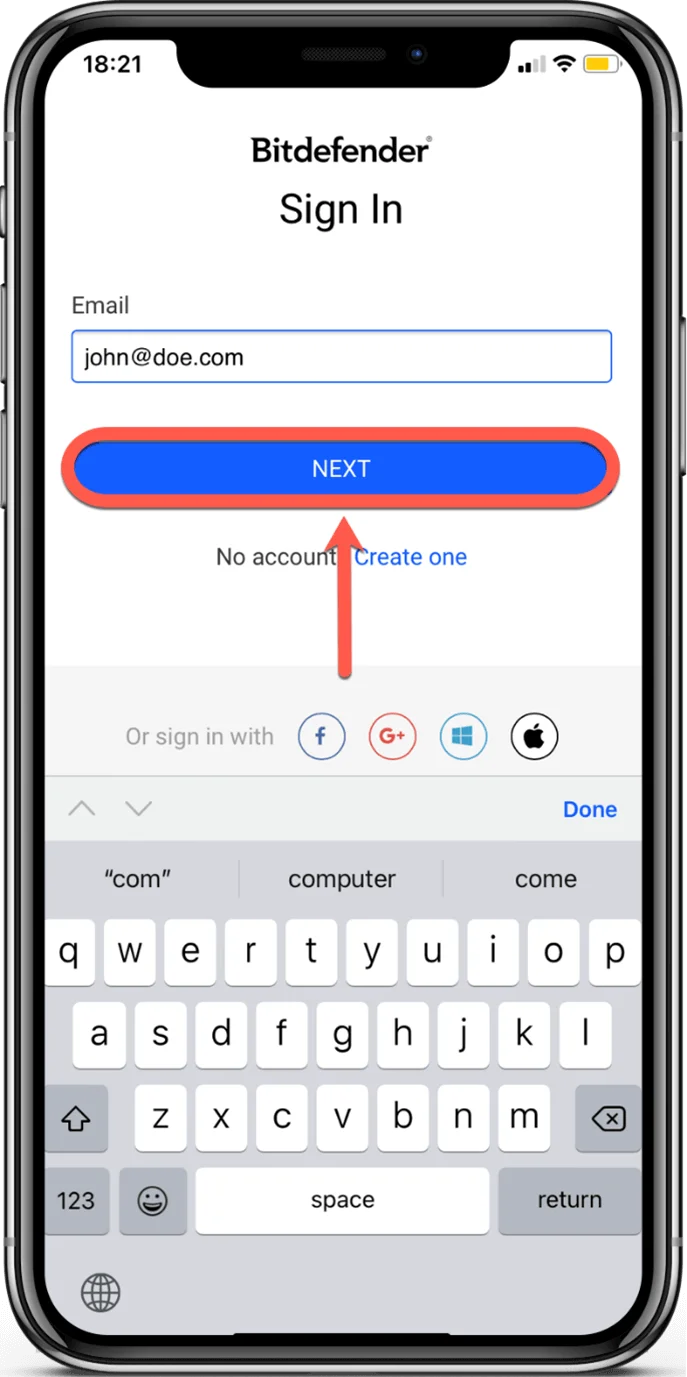
5. At that time, sign in to your Bitdefender Central account via your username and password.
Note: if you don’t have an account on the central.bitdefender.com platform, create one following the steps we mentioned before.
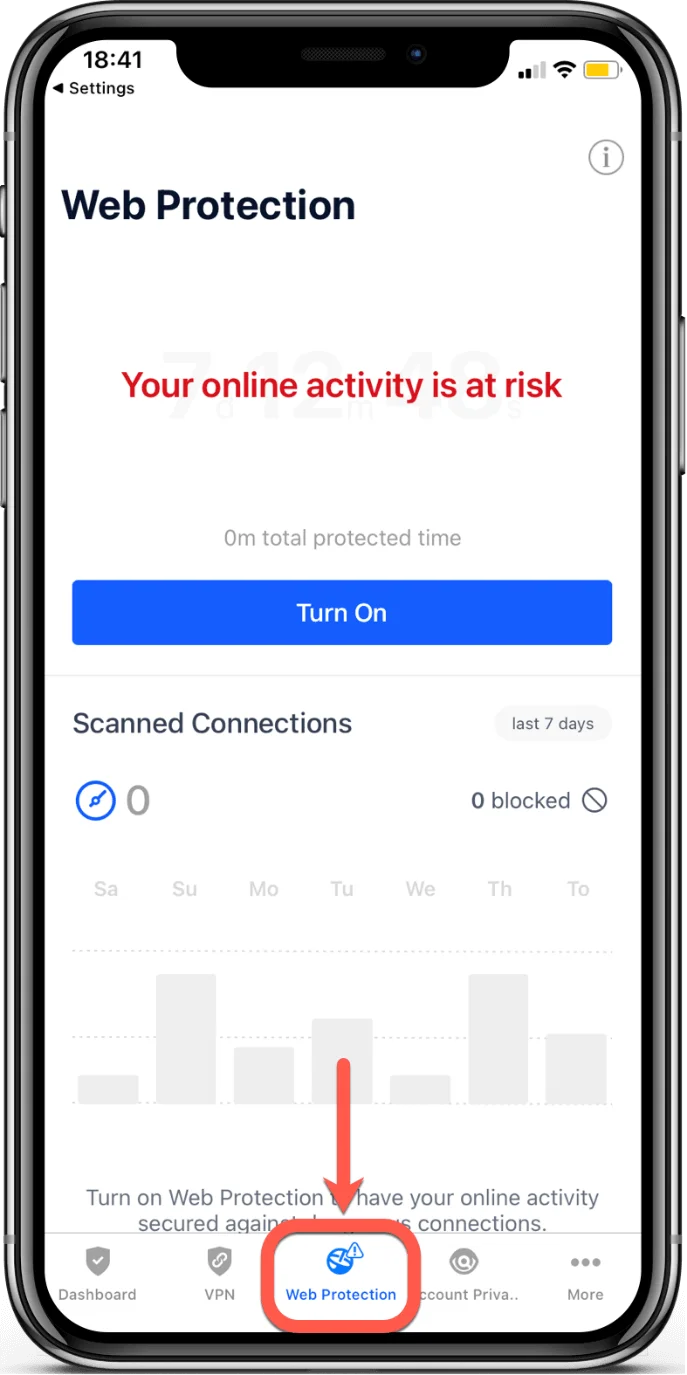
6. To complete the installation and secure your browsers, you must turn on the Web Protection feature in Bitdefender Mobile Security. The ‘Web Protection’ icon is accessible at the bottom of the screen.
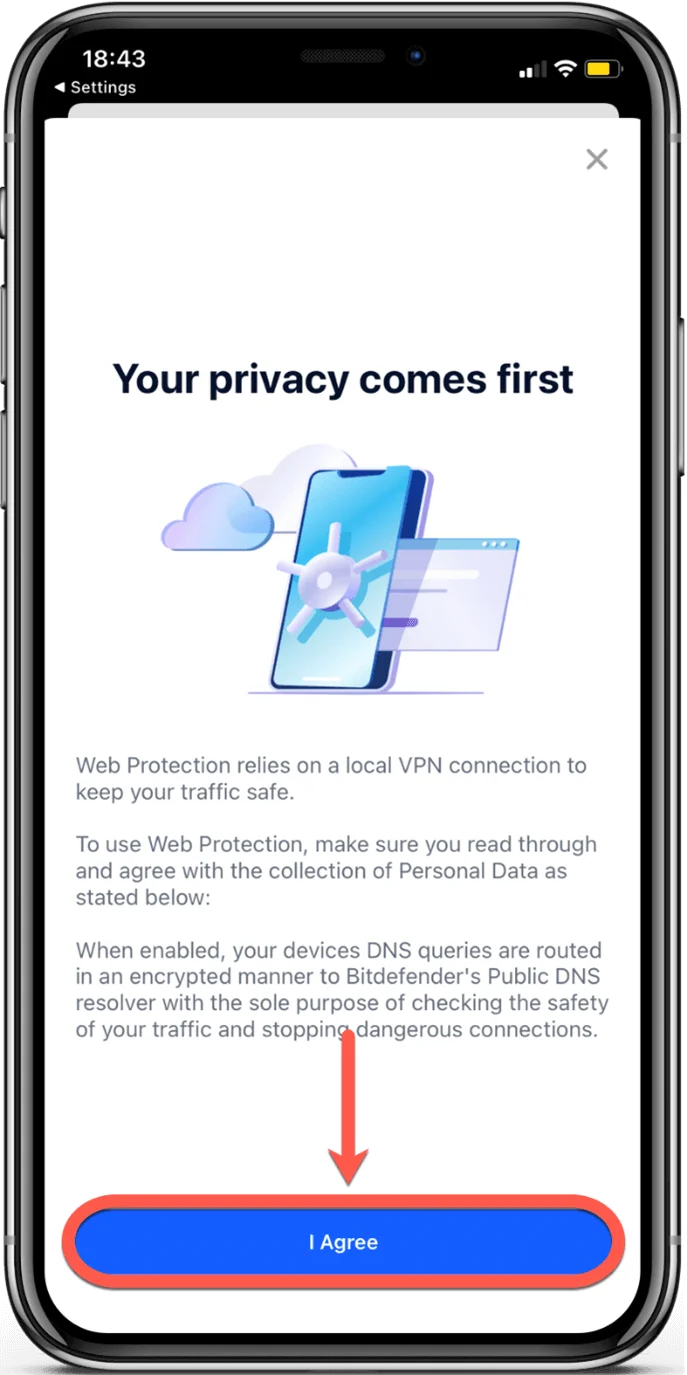
7. Choose ‘I Agree’ after you read and agree to the Web Protection privacy policy.
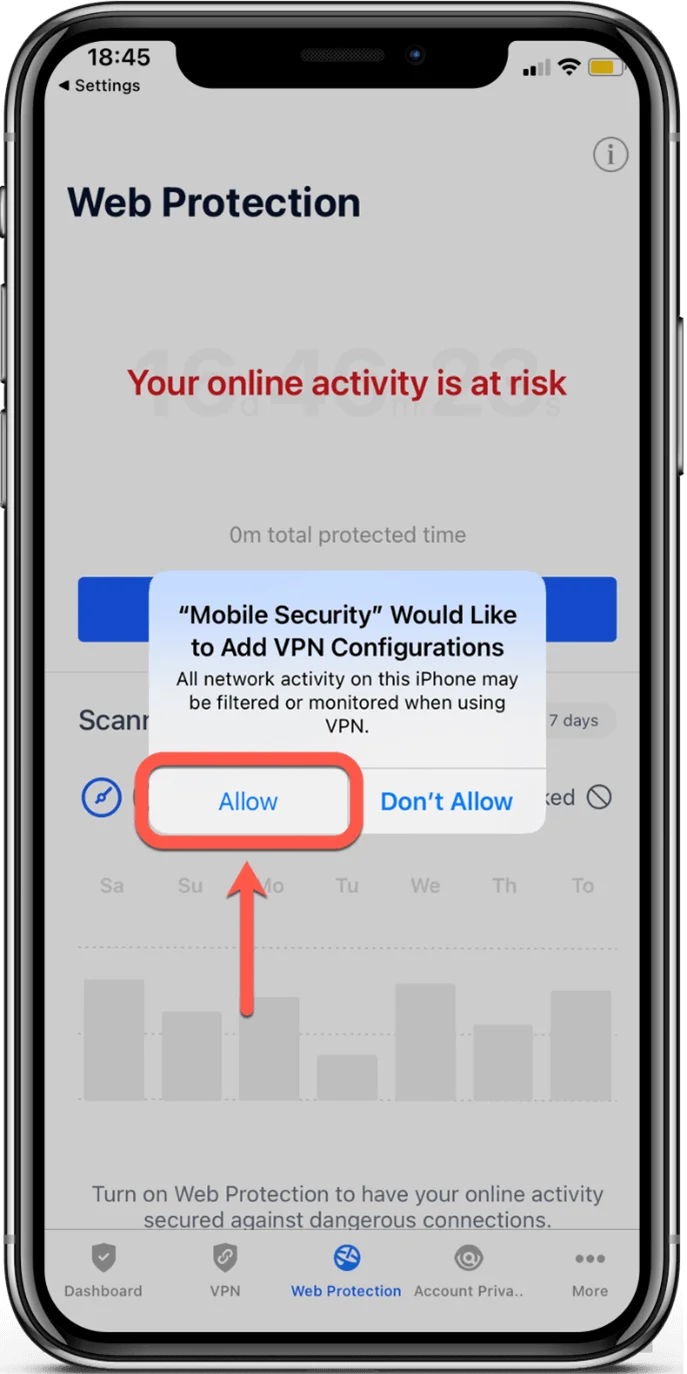
8. At the next step, press ‘Allow’ while notified to continue installing the web scan filter.
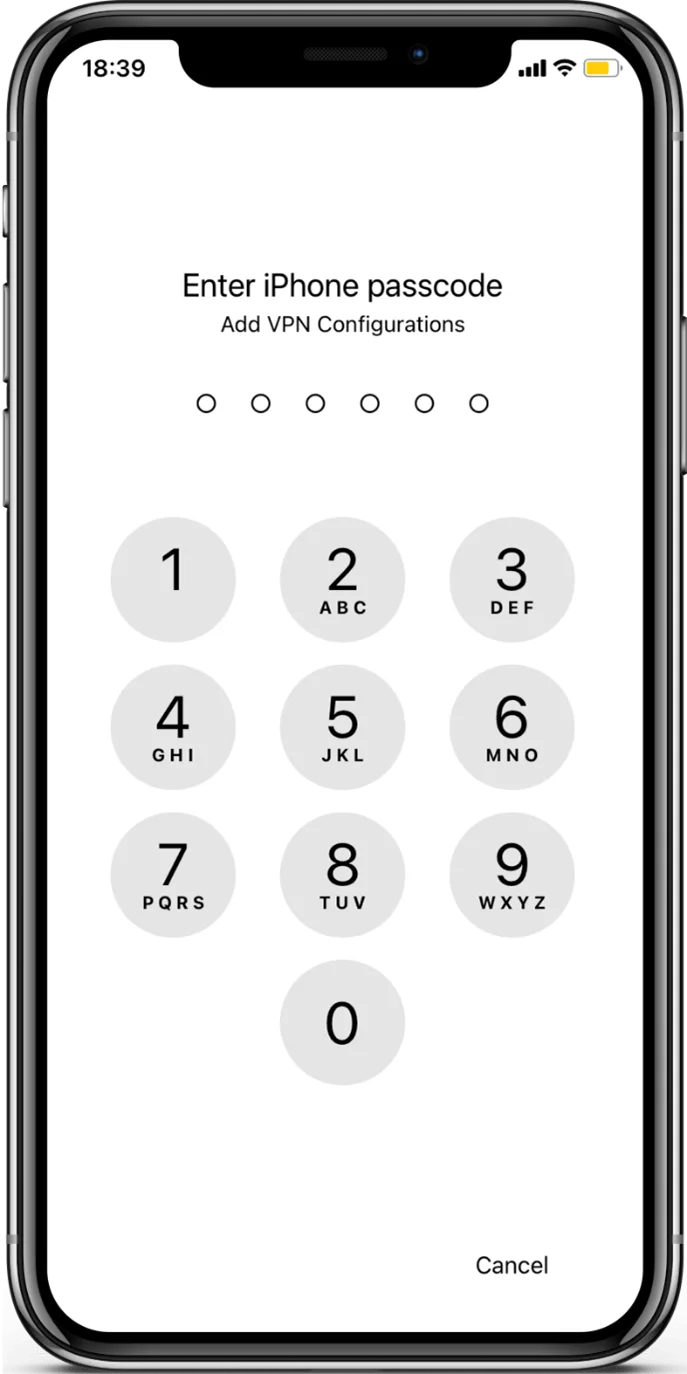
9. You are required to use an authentication method (fingerprint or PIN code) if it has been set to protect your device. After a short wait, Web Protection will be enabled.
You have successfully installed Bitdefender Mobile Security for iOS, and it’s ready to protect your device.
B. Install Bitdefender Mobile Security for iOS via Bitdefender Central
The simplest way to get Bitdefender Mobile Security for iOS is to download it from the Apple App Store. You can also install the Bitdefender Mobile Security app through your online account on Bitdefender Central. If you don’t have an account on the central.bitdefender.com platform, check the previous steps before moving forward.
1. Open a web browser on your mobile phone. Enter the https://central.bitdefender.com URL, and sign in to your Bitdefender Central account.
2. Tap the menu in the upper-left corner of the Bitdefender Central page to select ‘My Devices.’
3. In the My Devices section, tap + ADD DEVICE.
4. Choose Security in the selection screen.
5. At this point, if you access Bitdefender Central from the Android device you wish to protect, tap This device. You will be redirected to Google Play. If you access Bitdefender Central from another device, tap Other devices. You can then email a download link to your Android smartphone or tablet.
6. In both methods, you will be redirected to the App Store. Tap the cloud icon with an arrow pointing down to download and install Bitdefender Mobile Security for iOS.
7. When the download completes, open the Bitdefender Mobile Security app and tap Get started on the welcome screen.
All done! The app is installed and ready to use.
Summary of Bitdefender Activation
Software activation, in general, prevents others from illegal use or copying of a digital product you have purchased. To activate Bitdefender, you should complete the process from the Bitdefender central panel. Here we talked about this process in detail to help you activate and use products in the easiest way.
If you ever face any problems or issues, we’re here to help. So feel free to leave us a comment below or contact us directly. We’ll get back to you soonest possible.
0 Comments